
Do you find yourself brimming with knowledge and skills you want to share with the world? Something that can make a profound impact on your audience?
That’s a noble feeling.
If you want to reach that audience and make that profound impact, you’ve probably thought about creating an online course. And one of the best online platforms for course creation is Thinkific.
Note: This page contains affiliate links. If you purchase through links on this page, we may earn a commission at no additional cost to you.
Why choose Thinkific to build your course?
Thinkific is one of the most popular online course platforms in the e-learning industry. One of its biggest selling points is how incredibly user-friendly it is.
It has a drag-and-drop course builder, a landing page builder, and an AI-based course outline builder that sets up everything for you. As a bonus, you also get access to a bunch of marketing and student engagement features to make the learning process fun.
In this step-by-step guide, we’ll walk you through the entire course creation process in Thinkific. If you stick around till the end, we also share some bonus tips and show you how to engage your audience and encourage them to purchase your Thinkific course.
Let’s get started.
Setting Up Your Thinkific Account
Before you can create your first online course on Thinkific, you’ll need to set up your Thinkific account.
This initial step involves creating a profile, selecting a plan, and configuring your account settings.
1. Signing up for Thinkific
To get started, visit the Thinkific website.
Look for the “Get Started Free” button and click on it.
You’ll be prompted to enter your email address and name and create a password. Alternatively, you can sign up using your Google account.
After filling in your details, click “Create Your Account” to create your Thinkific account.

2. Accessing the Admin Dashboard
This is what you’ll see after signing up for Thinkific – the admin dashboard. This is where you’ll find all the tools and features to build, manage, and organize your course.
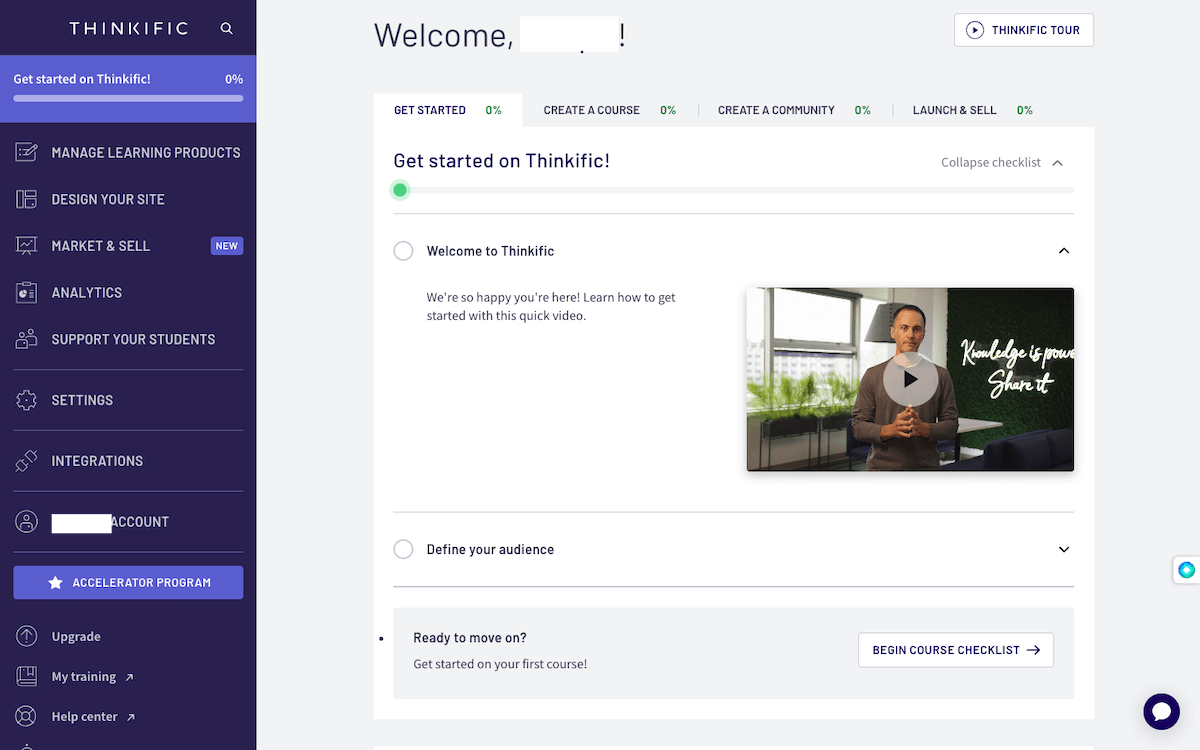
The dashboard gives you a complete overview of your course creation process – with the options to create new courses, manage existing ones, and organize your content.
Here’s an overview of everything you can access from your Thinkific admin dashboard:
- Course Creation Checklist: The first thing you see on the admin dashboard is a checklist to help you begin your course creation journey. It lays out all the steps you need to follow and keeps you from getting off the track.
- Settings and Customization: Here, you can personalize your course’s appearance. You can add your branding, change the primary colors of your course pages, add payment providers to receive payments and tailor it to your style.
- Content Organization: Under the “Support your Students > Courses” section, you can create new courses as well as manage and arrange your existing course content and instructors. You can also create sections ( lessons and chapters) to provide structure to your course. Or, you can do this while you create the course.
- Student Management: Under the “Support your Students” section, you can organize, segment, analyze, and message your students. You can also track their progress, reviews, quizzes, and assignments and enable discussions with them.
- Analytics and Insights: The dashboard also provides insights into your course’s performance. You can monitor enrollments, completion rates, engagement, and revenue, helping you determine how your course is doing.
- Sales and Marketing Features: The dashboard also gives you access to marketing and sales features like email, funnels, coupons, sales widgets, and affiliate programs.
- Integrations: You can connect your Thinkific account with multiple other third-party apps to maximize your course’s potential. For example, you can integrate with gamification apps to add more engagement features to your course. Or, you can integrate and use Zapier to increase productivity and grow your course.
This is your Thinkfic admin dashboard in a nutshell.
We’ve reviewed all the popular online course platforms and major Thinkific alternatives, and Thinkific stands out for having one of the most user-friendly and intuitive dashboards. There’s little to no learning curve, and you’ll find yourself comfortably using it within minutes.
3. Select a Pricing Plan
You can start with Thinkific’s free 14-day trial to test the platform.
If you decide that it’s the right platform for you, you can upgrade to one of the paid plans that start at $36 per month.
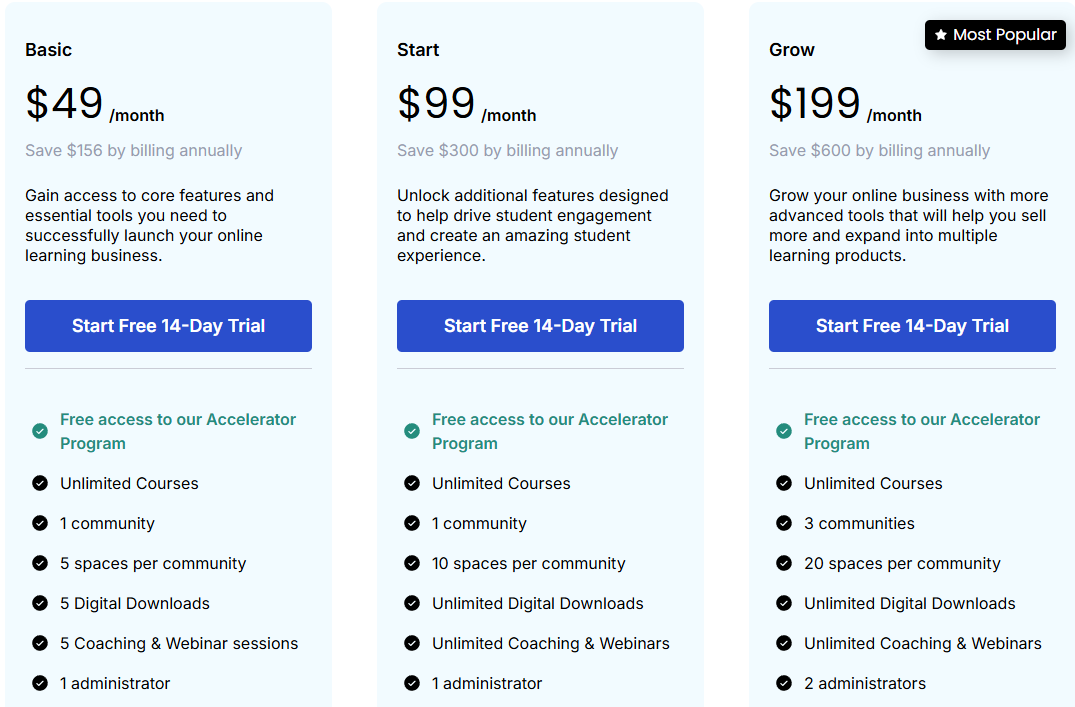
Each plan lets you create unlimited courses and enroll unlimited students, but they come with different features. The higher the pricing tier, the more advanced features you’ll get access to.
Take some time to explore the features and limitations of each plan to determine which one aligns best with your course creation needs.
Don’t forget that the plan should also suit your budget. Don’t worry, you can always upgrade as your needs and budget change.
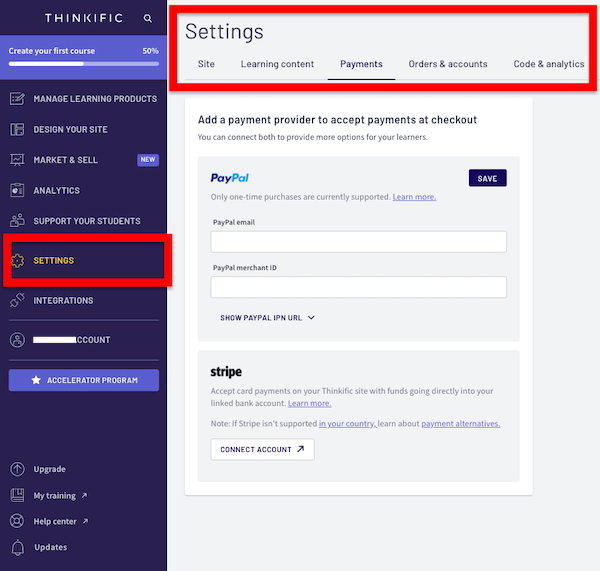
4. Account Settings
Once you create your account and select a plan, you can configure your account settings.
Here are some of the course settings you get access to:
- Site Details: This includes adding/changing your basic course site details like name, site URL, and emails, setting up the SSL certificate, and removing Thinkific branding.
- Learning Content: This is where you change and set up your course’s colors & font, course player’s theme, social sharing options, and course player logo.
- Payments: Set up your payment provider (either PayPal or Stripe) to receive payments after the checkout.
You can skip this step for now and start with the course creation process right away. You’ll get multiple opportunities later on to configure these settings as and when the need occurs.
Creating Your First Course and Uploading Course Content With Thinkific
Once your Thinkific account is set up and you’ve logged into the admin dashboard, it’s time to start creating your first online course.
Step 1: Creating Your Course Outline
To begin the course creation process, navigate to your Thinkific admin dashboard. You’ll typically find an option like “Create your first course” or “Manage Learning Products.”
If things start feeling a bit overwhelming, Thinkific has a handy step-by-step checklist. Just follow along, and you’ll have your course all set up before you know it.
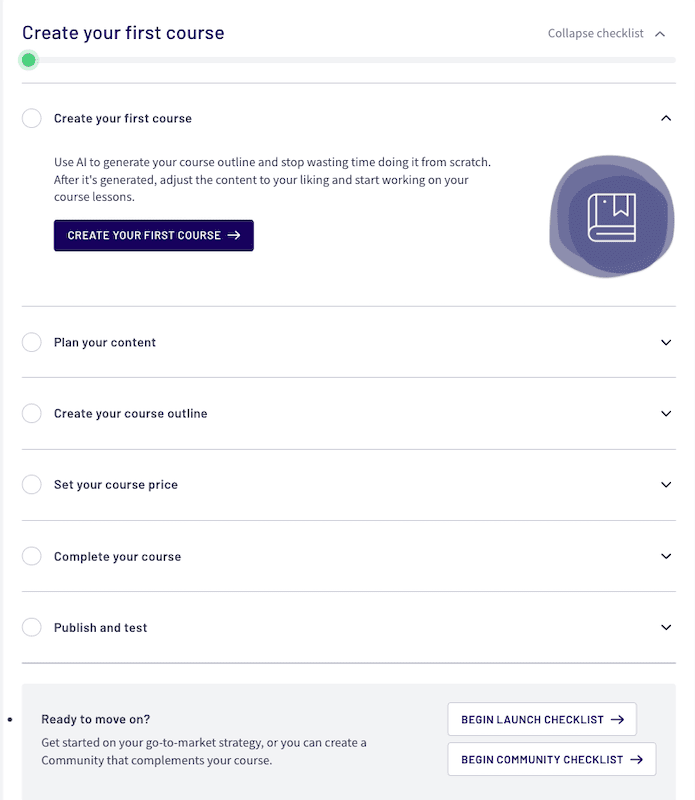
Once you hit the “Create your first course” button, Thinkific asks you to choose a course template. Think of these templates as your creative starting points.
Here are the Thinkific course templates you can pick based on your requirements:
- Pre-sell
- Mini-course
- Flagship course
- Webinar replay
- Membership resource library
- Blank (to start from scratch)
Let’s pick the Flagship course for this article.
After that, give your course a descriptive name. This name will appear on your course landing page and in listings, so make sure it’s compelling and easy to understand.
Next, Thinkfic prompts you to create your course outline (or curriculum, as they call it) that helps you further structure your course with chapters and lessons.
In a nutshell, together, chapters and lessons make a curriculum.
- Think of chapters as the main sections or modules of your course. Each chapter serves as a container for a specific set of related lessons. For instance, if you’re creating a photography course, a chapter could be “Mastering Camera Settings.”
- Within these chapters, you can further break down content into lessons. These lessons contain the actual content that your students will engage with, including text, videos, quizzes, and assignments.
If you’re unsure where to start with the outline, Thinkific has a built-in AI outline tool that can be your wingman here. You’ll just have to answer a few questions about your target audience and course, and it will help you draft the outline in just a few minutes.
For instance, here’s the course outline it created for our example course, “How to Create a New Course.”

If this initial outline isn’t up to the mark and you plan to dive deeper into the course, think of it as a foundation.
You can move around both the chapters and lessons the way you want. Feel free to expand, remove, or modify anything to tailor your course for your audience. This outline is just the starting point; you have the creative freedom to craft your course as you see fit.
Step 2: Uploading Course Content
Once you set up the basic structure of your course, the next step is uploading course content to your lessons.
Thinkific offers two methods for uploading content, including:
- Adding Individual Lessons:
If you use a course template and the AI outline builder (like we did above), your course will come pre-loaded with empty lessons and chapters. You can start adding content to these lessons by clicking on each lesson one by one.
You can also add more lessons individually by simply clicking on the chapter where you want to insert the lesson. Then, click the “Add Lesson” button.
Thinkific will give you the option to add different learning content types, such as:
- Video
- Text
- Audio
- Downloadable files
- Presentation
- Multimedia resources hosted outside of Thinkific
- Live sessions using Zoom’s video meeting and other webinar tools
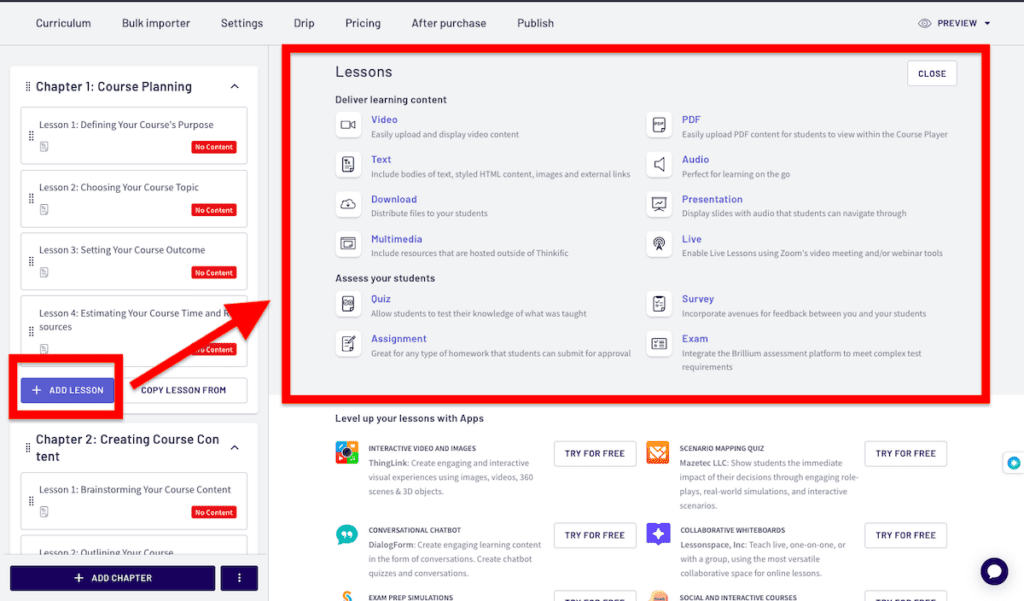
You can also include quizzes, surveys, assignments, and exams to make your course engaging and interactive.
Adding these student engagement and assessment elements is equally straightforward.
Here’s the quiz builder, for instance:
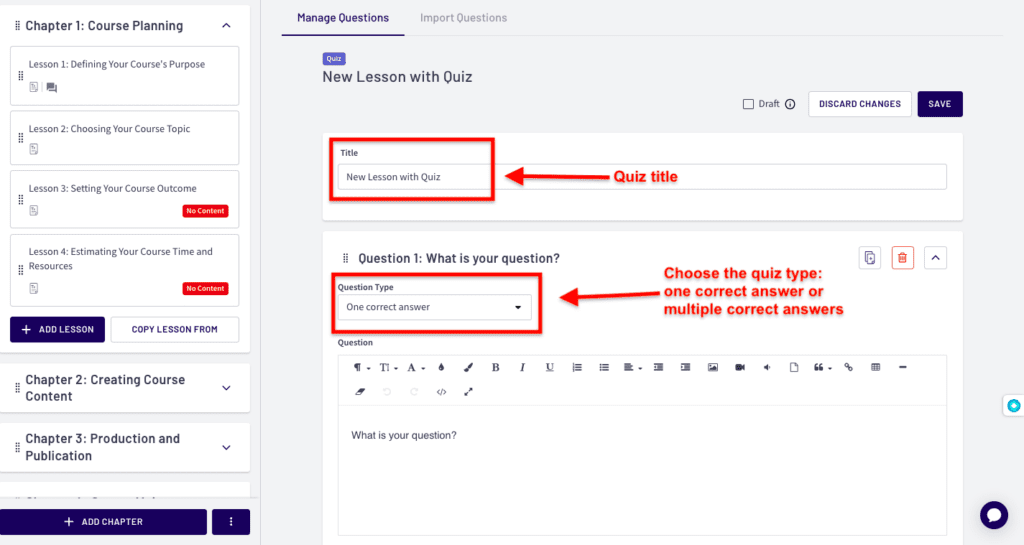
Thinkific lets you add two types of quizzes: with one correct answer or with one or multiple correct answers.
The quiz editor is similar to the text editor, allowing you to customize your questions and answers. You can make your quizzes interactive by adding videos, audio, images, and the like.
As you scroll down, you’ll see settings for each lesson. Since this lesson contains a quiz, you’ll also get the option to select whether this quiz requires a passing grade or not, a randomized question bank, and if you want to make this quiz a prerequisite.

Aside from some standard options common to every lesson, each lesson will have different lesson settings based on the content type it has.
- Uploading content in bulk using Thinkific’s Bulk Importer
If you have a significant amount of content to upload or want to streamline the process, you can use Thinkific’s Bulk Importer.
It lets you upload multiple lessons and their content all at once. You can drag and drop files from your computer system, add links, or import content from Facebook, Instagram, Google Drive, and Dropbox.
This is particularly useful when migrating content from other platforms or creating a course with a pre-existing structure.
Step 3: SEO and Course Setting
After uploading your course content, you’ll want to focus on optimizing your course for search engines and fine-tuning settings to create the best possible learning experience.
Starting from Basic settings, Thinkific lets you:
- Choose a custom URL for your course
- Change your course name
- Choose your instructor
- Pick between Hidden and Private course options
- Enable or disable text copying

After the Basic settings, you can configure the following:
- Course image & description: Add a course image and description.
- Course player appearance: Choose between a dark theme or light theme, change your course player’s color & font, add a course logo, and customize how lessons will appear in the Course Player sidebar.
- Course progress & completion (you can also issue a completion certification here): You can customize how your students progress and complete your course. For example, choose whether you want to display a course completion message or not, issue a course completion certificate, or create a custom completion page.
- SEO settings: You can optimize your course for search engines (SEO). Thinkific lets you create an engaging SEO title and description and use keywords for visibility. These settings help you get discovered by your target audience.
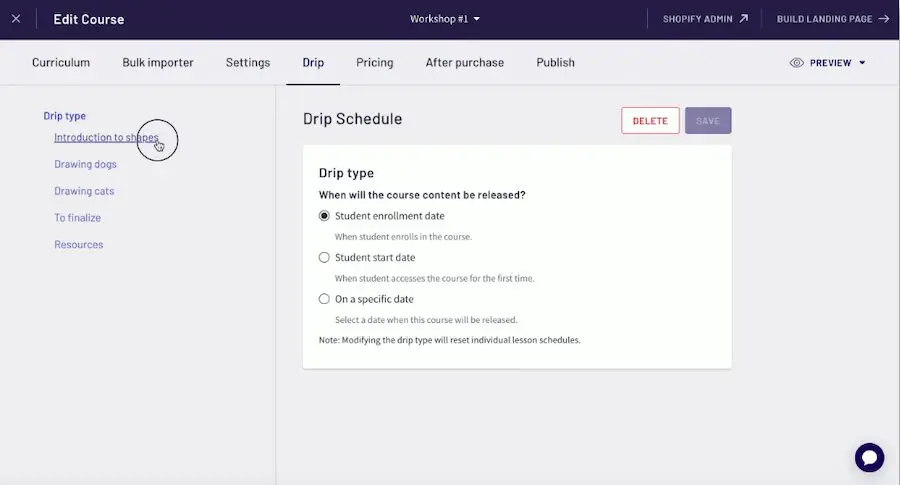
Step 4: Add a Drip Schedule to Your Courses
A Drip Schedule allows you to control when students will have access to your course content. You can schedule when and how your lesson content becomes available to your audience.
For example, you can choose to launch the next chapter on a specific launch date or time period.
You can choose from three options for how to release your lesson content:
- Based on the student enrollment date
- Synchronized with the course start date of each student
- Fixed calendar date when the lesson content will be made available to all students
Step 5: Setting Course Pricing
Once you configure your course’s drip schedule, the next step is to set up course pricing. After all, you’re not setting up your course just for fun. You also want to sell your online course and reap the rewards for all the hard work you poured in.
Thinkific offers various pricing models, giving you flexibility in how you charge for your course.
Here are all the pricing options you can set with Thinkific:
- Free course
- One-time payment
- Subscription-based/recurring membership
- Monthly payment plan

That’s not all. If you don’t want to limit your audience to one pricing structure, you can also set your additional pricing options for your course. For example, it could be two installments of $50 or four installments of $25. It’s up to you – you can add as many prices as you like.
If you’re confused about how to price your courses, put yourself in your customer’s shoes. Your price point and strategy should cater to your target audience.
Here are some time-tested tips to help you price your online courses:
- Value-Based Pricing: This strategy involves determining the value your course offers and pricing it accordingly. If your course contains valuable content, unique insights, and actionable knowledge, you can command high prices.
- Competitive Pricing: If you’re having difficulty determining your course’s pricing point, look at what others in your niche are charging. Based on your competition, you can either price your course similarly or slightly below the market price to get a competitive edge.
- Cost-Plus Pricing: This involves pricing your course based on the total cost you incurred in creating it.
- Freemium or Free with Upsell: If you’re a new course creator, you can offer your initial lessons for free to catch people’s attention and then upsell premium content. It’s a great way to attract a broader audience and promote your course.
Step 6: Customizing the After-Purchase Course Experience
When you’re in the market to sell something, the buyer experience doesn’t end merely after selling the course.
To make the most out of your courses, you need to engage your students to retain them and generate more revenue. That’s why you need an engaging post-purchase experience.
Luckily, Thinkific lets you create the after-purchase workflow with just a few clicks.
You’ll find the “After Purchase” option right beside the “Pricing” tab. You can access it by heading to the Manage Learning Products from the dashboard, then selecting Courses >> specific course in the Course Overview >> After Purchase tab.
Before redirecting your audience to their next step, you’ll have to create a flow.
Once you’re in the “After Purchase” tab, just hit the “Add flow” option from the left-hand side and name your flow under “Flow Name.”
Next, under the “Prices” section, select the checkbox next to the price you want for this flow.
Finally, Thinkfic provides multiple options to help you tailor this experience, including:
- Customizing Messaging and Upsells on the Thank You Page:
Once a customer makes a purchase, you can direct them to a Thank you page. You can use this chance to display a personalized message or offer additional products or courses immediately. It’s a great upselling or cross-selling opportunity.
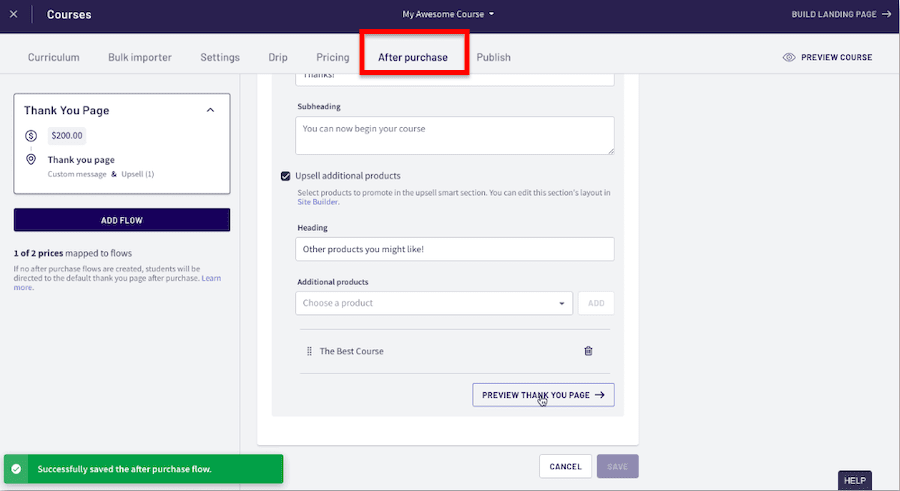
For instance, if you just sold a beginner’s photography course, you can use this Thank You page to recommend an advanced course or offer photography-related e-books.
- Send Students to the Course Player:
If you don’t want to cross-sell or upsell anything, you can simply direct your students to the course player immediately after purchase.
This option is useful when your priority is course engagement and learning.
- Send Students to a Community:
If you want to foster student engagement, you can send your audience straight to your Thinkific community after they buy your course.
For that, you do need to build a learning community with Thinkfic first. It’s a pretty simple process similar to what we did while creating this course. You just have to follow a step-by-step approach.
- Send Students to a Custom URL:
If you have other resources or web pages outside of your Thinkfic course, you can redirect students to a custom URL.
It could be anything – from your blog to a private members-only website or any other platform that complements your course content.
You just have to select the “Custom URL” option from the dropdown menu, and then under URL, add your destination URL.
Step 7: Setting the Publish Status
Last, you’ll have the option to pick your “course status.”
You can choose from the following options:
- Draft: It’s just a draft, and students cannot purchase or enroll in this course unless you choose to publish it.
- Pre-order: You can set this course for pre-order, allowing students to enroll in this course before it’s published. When students enroll in this course, a course card will appear in their Student Dashboard with a “Coming soon” label.
- Published: Your audience can purchase, enroll in, and access the content of this course. This course will also appear on the Student Dashboard.
Step 8: Building a Landing Page for Your Course
Once you create your course, you need a page to display your course content and other related information.
How else will you reach your target audience and allow them to sign up for your course?
That’s why the obvious next step is creating a landing page (sales page) for your course.

That’s not the only way to access the landing page builder in Thinkfic. You can also access it from the main dashboard by heading to “Design Your Site > Site Pages.”
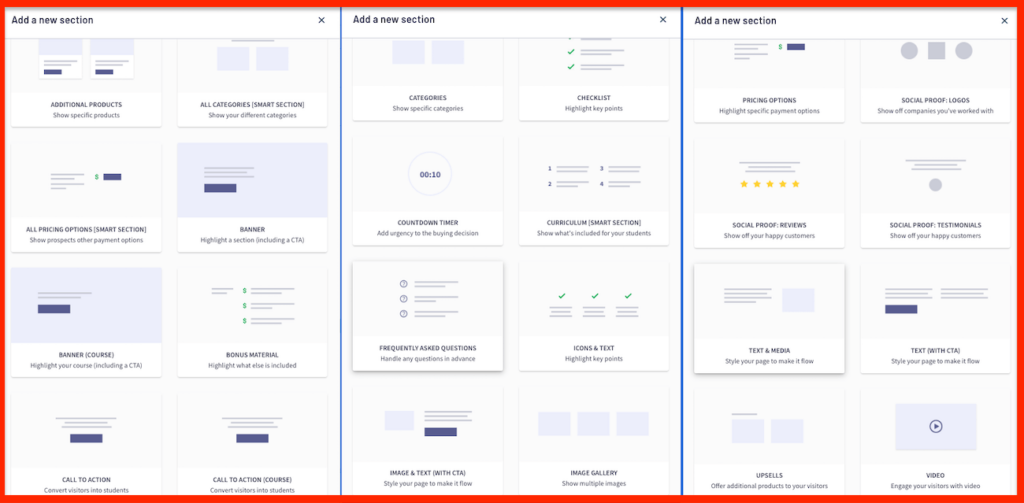
The pre-designed landing page includes sections like a banner, course curriculum, call to action, and footer. But you have the flexibility to add more sections to your sales page by clicking the “Add Section” button on the left side panel.

Following are some of the pre-built sections you can add to your course landing page:
- Additional Products
- Pricing Options
- Bonus Material
- Categories
- Checklist
- Countdown Timer
- Frequently Asked Questions
- Image Gallery
- Instructors
- Lead capture
- Social Proof (Logos, Reviews, Testimonials)
- Upsells
- Video
The best part? Once you add them to the left side panel, you can move these web page elements around to arrange them the way you want.
You can also edit the section by clicking on it.
For example, when you click on the “Banner” section, it gives you the option to edit:
- Headings
- Background color
- Image or video
- Size and alignment
- Add or modify the CTA button
And the modifications occur in real-time, which is super helpful. As you make changes in the left panel, you’ll see the change and how it will appear right away in the builder.

Aside from editing each section, you get basic customization options for the overall theme.
Here are the theme settings you can change:
- Choose from three theme styles
- Overall theme colors
- Desktop typography
- Mobile typography
- Favicon image
You can also change your entire theme from your dashboard. Just head to “Design your site > Theme library,” and you’ll get access to three theme types.
Another helpful feature is the ability to see how the page will appear on a desktop site as well as the mobile site.
Just like everything in Thinkific, the site builder is pretty easy to use. You’ll need 10-15 minutes at most to get familiar with the interface, and before you know it, you’ll be a pro.
Marketing and Student Engagement Features to Enhance Your Thinkific Course
Now that your course is up and running, you’re ready to see the course buyers rolling in.
But creating a course and presenting it through a landing page isn’t nearly enough. Everyone is doing that. You have to find a way to entice your target audience to turn into recurring, buying customers.
Thinkific offers various marketing options to help you market your online course and give a final nudge to potential buyers who might still be on the fence.
You can access these marketing features from your dashboard from the “Market & Sell” option.
Here are all the marketing options you get:
Sales Funnels
Thinkific lets you create tailor-made customer journeys to meet your unique business goals.
Once you head to the “Market & Sell > Funnels,” you get to choose from three funnel templates:
- Free lesson funnel: It helps you boost sales by enticing customers with a free lesson.
- Free download funnel: Instead of a free lesson, here, you can attract customers with a free digital download as a lead magnet.
- Sales page funnel: It’s a 2-step funnel template that comes with an improved Sales Page that leads to the checkout.
Based on the template you pick, Thinkific will lead you every step of the way to help you launch the funnel. You’ll just have to enter a few details, and they do all the legwork for you.
For example, we picked the “free download funnel” for the sake of this article. After uploading the downloadable product and entering a few details about it, Thinkific presented us with a ready-to-use funnel – complete with a pre-designed lead capture page and download page.
Here’s the lead capture page they designed, for instance:

The web page text you see here is all crafted by Thinkific, although you are free to change it how you want.
Beyond Regular Pricing: Discount Coupons
Thinkific Coupons lets you build promotional offers and discounts to grow your audience and encourage them to make the final purchase.
To create a coupon, head to “Market & Sell > Coupons” from your main dashboard. Finally, select the “New Coupon” option to get to the coupon creation screen.
You’ll be prompted to enter your coupon’s name and set an expiry date (optional).
You can also choose from two discount types: a fixed discount or a percentage discount.
The next step requires you to pick the specific product to which you want to apply your discount coupon. Alternatively, you can pick the “all product” option to offer a site-wide discount.
You can also set up specific coupon codes, so only the students with the code can access the discount.
Once you’re through with all the settings, select your coupon duration and hit the save button.
Abandoned Cart Feature
Thinkific’s TCommerce now includes the powerful Abandoned Cart email remarketing feature, perfect for boosting sales and engagement. With nearly 70% of online shoppers abandoning their carts, this tool helps course creators reclaim lost revenue by sending automated follow-up emails to potential customers who don’t complete their purchases.
Say goodbye to manual follow-ups and hello to seamless recovery. This feature also allows you to personalise subject lines and headings to match your brand’s voice, giving you the flexibility to test and optimise your messages using Thinkific’s built-in email marketing tools.
Valuable lead data is readily accessible, making it simple to track and re-engage potential buyers. Plus, with the option to include a consent box during checkout, you can ensure customers are open to receiving future marketing emails, boosting the reach of your campaigns.
You can monitor the effectiveness of your follow-up efforts using key metrics like click-through rates (CTR) and click-to-open rates (CTOR) available in the email marketing dashboard, allowing for data-driven enhancements.
Build a Learning Community
Once you’ve wowed your audience enough that they finally purchase your course, you have to find a way to keep them engaged.
Aside from offering valuable course content, you can also create a community where your students can connect and learn from you and each other.
To create a Thinkific community, head to “Manage Learning Products > Communities” from your admin dashboard.
Select the “Start a New Community” option, give a name to your community, and then choose how members can access it: right after checkout or based on site, course, or group settings.

To launch your community, follow the simple setup process from the right-hand corner:
- Set up your profile
- Publish a welcome post for your audience
- Customize your community (it includes basic appearance settings, SEO settings, community access configuration, pricing, after-purchase flow, and choosing the publish status).
- Setting up community access
Once you play around with the above settings and are ready to publish your community, finally hit the “Publish Community” button.
Course Bundles
To sweeten the deal, you can package multiple courses and communities together with Bundles.
Bundles are a great way to sell your courses as a complete package at better rates. You can bundle your courses by heading to “Manage Learning Products > Bundles” from your dashboard.
That was just a glimpse of how Thinkific lets you market your course and engage your students. Make sure you give this in-depth Thinkific review a read to know more about Thinkific’s courses and its multiple student engagement and marketing features.
Mastering the Art of Course Creation with Thinkific
We covered everything you’ll need to start your course creation journey with Thinkific.
From navigating the dashboard to uploading course content and building the sales page to adding coupons to your course, you are ready to launch your own Thinkific course.
Beyond course creation, we also touch upon community building to help you engage and retain your course viewers.
If you find yourself stuck somewhere in the process, Thinkific offers a helpful knowledge base with videos and text-based tutorials that guide you throughout the process. Or alternatively, feel free to ask us any questions and we’ll do our best to help.

Jeff Cobb, Founder of Learning Revolution
Jeff Cobb is an expert in online education and the business of adult lifelong learning. Over the past 20+ years he has built a thriving career based on that expertise – as an entrepreneur, a consultant, an author, and a speaker. Learning Revolution is a place where Jeff curates tips, insights, and resources to help you build a thriving expertise-based business. Learn more about Jeff Cobb here.
Table of Contents
Related Posts
Thinkific Pricing (2026): What’s the Real Cost [Fee Calculator]
Skool vs Thinkific (2026): My Comparison & Verdict After Using Both
Thinkific Review (2026) | Pros, Cons & Pricing for Online Course Creators [With Examples]