Never build an empire on rented land.
This statement applies 100% to all e-learning businesses.
Third-party e-learning platforms and marketplaces can help you avoid the technical issues and hassles of running a website. But you don’t own them and must pay a monthly fee or share a large chunk of your earnings per sale.
So, if you want to grow your brand and build a sustainable business where you have complete control, start a WordPress website to sell online courses.
Setting up a WordPress site is easy and doesn’t require advanced technical skills. Plus, with the right plugins, you can turn your site into a world-class online school with extensive e-learning features.
In this article, we’ll walk you through the process of starting a WordPress site to sell online courses like a pro.
Let’s dive in.
Why Sell Online Courses From Your Own WordPress Website
WordPress is the most popular content management system (CMS), powering millions of websites worldwide.

Here’s a quick explanation of why selling online courses from your WordPress site is a great idea.
WordPress Plugins Offer Unmatchable Flexibility
No other content management system (CMS) or online course platform comes even close to the flexibility WordPress offers. For example, thousands of free and premium WordPress plugins enable you to add any feature to your website and integrate it with numerous marketing and business tools. So no matter what functionality you want in your site, you’ll find a WordPress plugin for it.
Offers A Tailored User Experience
There are hundreds of thousands of free and premium WordPress themes that enable you to build any kind of website. In addition, WordPress themes are highly customizable, meaning you can create a tailored user experience that resonates with your audience and is consistent with your brand image.
Get Advanced User Analytics
Most third-party online course platforms give you limited user insights. But with WordPress, you can use Google Analytics or any other analytics tool to get in-depth user data showing you precisely what your audience wants while allowing you to tailor your strategy to their needs.
Use Multiple Monetization Methods
Online course platforms allow you to make money by selling courses only. But WordPress opens unlimited monetization opportunities.
For example, you can use Google Adsense and sponsored content on your blog or publish affiliate reviews along with online course sales to grow your revenue.
Save Money In The Long-Run
WordPress is free. So, you only need to buy a web hosting account and domain to get your site up and running. Even if you purchase a few premium plugins, WordPress still costs less than most online course platforms in the long run.
We could add a dozen more reasons about the advantages of selling online courses with a WordPress site. But the ones we’ve listed should be enough to convince you as they cover the most critical aspects of running an online business.
How To Sell Online Courses From A WordPress Site
WordPress is perfect for building a website to grow your audience and increase revenue. But there are multiple ways to sell online courses on your website.
Here are the two most popular approaches:
Sell Courses Using A Third-Party Online Course Platform
As we said, WordPress is great for audience building because of its flexibility and all the marketing tools it can integrate with. But third-party online course platforms also have their strengths. For example, they give you a plug & play e-learning solution to manage your students, sell courses, and process payments.
So, you can use WordPress and online course platforms together.
Here’s how it works.
- Your WordPress website will remain your brand’s home base.
- An online course platform will provide your students with the ideal eLearning environment to buy and consume your courses.
- You will create a dedicated “Courses” page listing all your digital products on your site.
- When visitors click on a course, they’ll be taken to your online course platform’s sign-up page where they can buy your course and start watching your content.
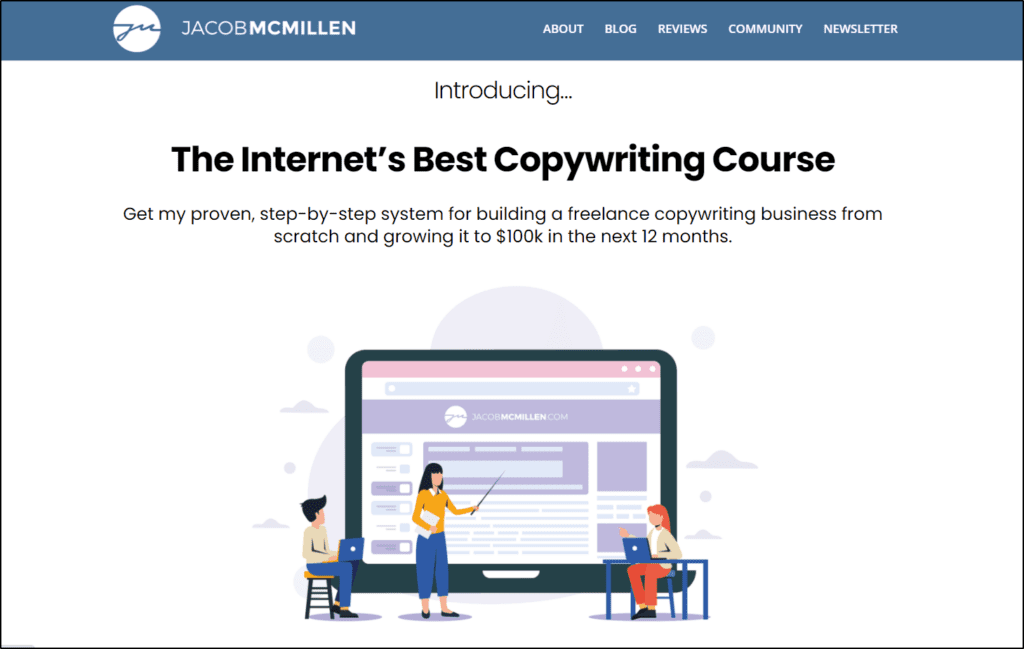
This is how Jacob McMillen sells courses on his WordPress website.
His website has a dedicated landing page that shares all the details of his course and has a call to action to drive sales.
But when you click on the CTA, it takes you to his Kajabi checkout page.
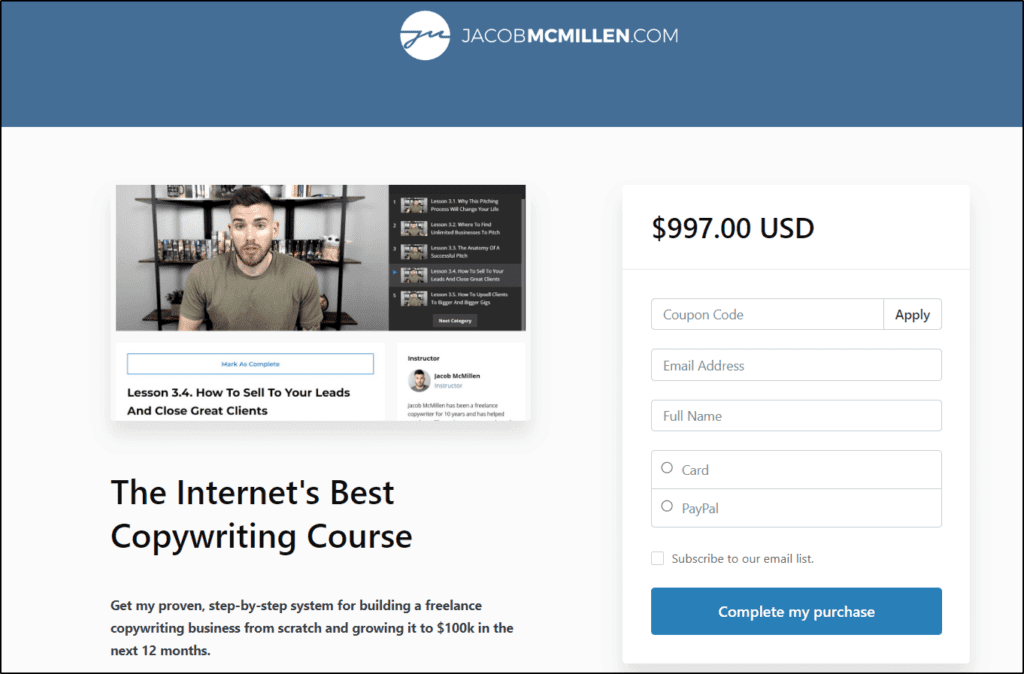
It’s so seamless an average user doesn’t even realize they’re on a different site.
You can do the same using any of these online course platforms.
Thinkific

Thinkific is the best online course platform from a course creation and student experience perspective. It comes with everything you need to set up engaging online courses, memberships, drip content, and any other form of info product. You can customize it to look exactly like your WordPress website, so your students get a consistent experience.

Read our detailed Thinkific Review to learn how it works.
Kajabi

Kajabi is an all-in-one online course platform that hosts your courses and offers excellent email marketing and sales features. It is a ready-to-use eLearning solution to create quizzes, assignments, drip content, and other forms of info content. In addition, it provides plenty of payment options to your customers.

Read our detailed Kajabi Review to learn more.
Sell Courses Using A WordPress LMS Plugin
You can host your entire online course business on WordPress without using any online platform.
How? By using WordPress LMS plugins.
As we said earlier, WordPress plugins can transform your site into any online business. Using a learning management system (LMS) plugin, you can add a complete online school to your WordPress site to host courses, create content, manage students, and process payments.
With this approach, you can keep the students on your website and provide them with a seamless experience without relying on outside help.
This is exactly how Yoast SEO Academy works.

Yoast Academy uses LearnDash, a popular WordPress LMS plugin, to host courses and serve content on its website.
Here are some of the best WordPress LMS plugins to add an online school to your site.
MemberPress

Memberpress transforms your WordPress site into a world-class membership and online course platform. It allows you to add a paywall to any section of your site and offer multiple subscription tiers to your members. You can use it to sell online courses, digital products, memberships, and product bundles.

Read our full Memberpress Review to learn more about it.
AccessAlly

AccessAlly is among the top WordPress LMS plugins with excellent features to sell online courses, memberships, and digital products. In addition, it has some of the best marketing features in any WordPress LMS plugin.

Read our full AccessAlly Review to learn more about it.
LearnDash
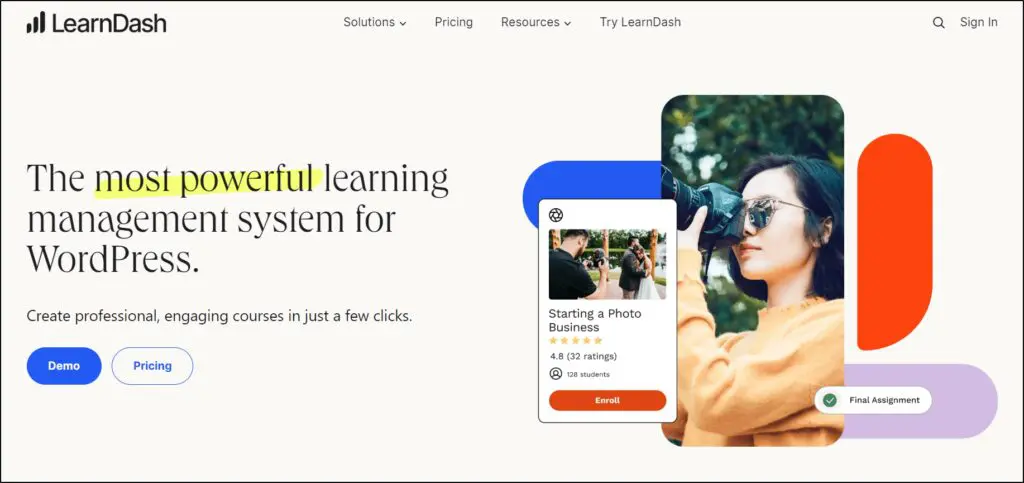
LearnDash is our favorite because of its outstanding student management and engagement features. It does everything expected of an LMS by allowing you to host online courses, serve drip content, and process various payment gateways. In addition, LearnDash offers excellent landing page templates, multiple quiz types, and graded assignments to evaluate our students and offer an engaging learning experience.

Read our detailed LearnDash Review to learn more about it.
WordPress LMS or Online Course Platform – What Works Better With WordPress?
Both approaches have their pros and cons. But here’s our opinion.
If you have the budget to invest in an online course platform so that you don’t have to set up an online school in WordPress, go for the first approach. This way, you’ll use your WordPress site as your main branding and sales engine but rely on a specialized online course platform to deliver your content.
But if you want to provide a tailored experience to your students, keep them on your site, and retain total control over your content, using a WordPress LMS is the better option.
We prefer using an LMS plugin with my WordPress website because it is more customizable and offers greater flexibility.
And trust us, configuring it isn’t as difficult as you think.
Let us explain in the next section.
9 Steps To Starting A WordPress Site To Sell Online Courses
Here’s the step-by-step process to start a WordPress website to sell online courses from scratch.
Step #1: Get Website Hosting And Domain Name
To start a WordPress website, you need to get a hosting service and a domain name. A web hosting service provides the tools and storage space to manage your website data. A domain name is the address users enter in their browsers to access your site.
Which hosting service should you purchase? We recommend Hostinger for beginners since it’s an affordable shared hosting service with all the necessary features for a successful WordPress site.
But if you don’t have budget limitations and want a high-performance hosting service, WPEngine is the perfect choice.
For more options, read our detailed analysis of the best web hosting companies and the factors you should consider to evaluate a hosting service.
Most web hosting companies offer a free domain name with your account. Make sure you register a domain name that’s brandable, credible, and easy to spell.

With these steps out of the way, you’re ready to install WordPress on your domain name.
Step #2: Install WordPress On Your Site
WordPress is a free, open-source CMS you can install on your domain from your web hosting account. Most web hosting services offer 1-click WordPress installation, which sets up your WordPress site in just a few minutes.
Here’s how to do it in Hostinger.
(The process might vary to some extent in different services, but it’s largely the same.)
- Log in to your Hostinger account (get one here if you don’t already have it)
- Go to Websites from your dashboard.
- Click Manage next to your domain.
- In the Website section, click Auto Installer.
- In the Auto Installer section, choose WordPress.
- This takes you to the WordPress installation form, where you need to enter your website title, username, password, and admin email.
- Click install.
Congrats, you’ve successfully installed WordPress on your site.
It’s that simple.
Now, to access your site’s admin section, you can go to this URL: https://[yourdomain.com]/wp-admin
Or go to Auto Installer → Installed Applications → Menu link → Manage
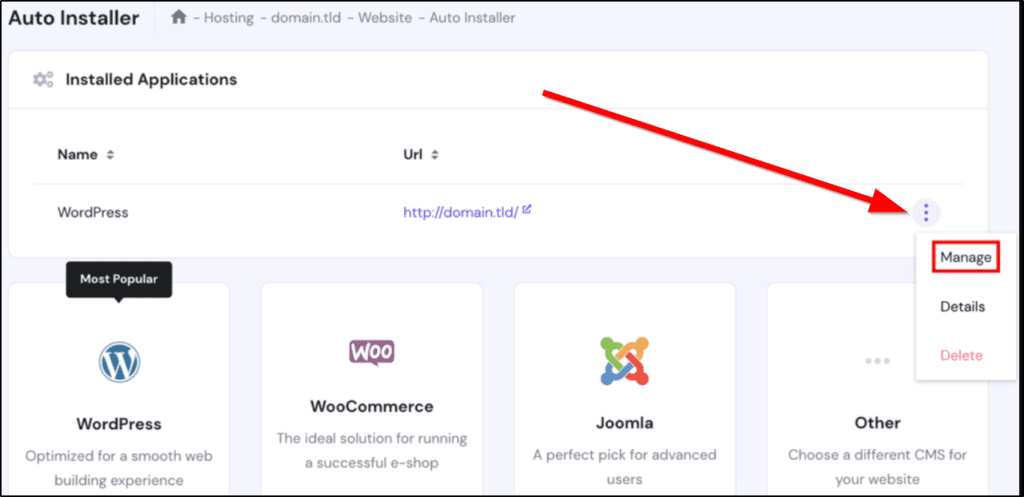
This takes you to your site’s dashboard, where you can click Edit Website to access your WordPress admin area.
Now let’s get your site ready.
Step #3: Install A WordPress Theme
We love WordPress because it allows me to create stunning websites in a few hours without hiring expensive designers.
How? By using any eye-catching WordPress theme.
A theme is simply your site’s design. It sets up your site’s navigation, header, and age design so that you can start creating content.
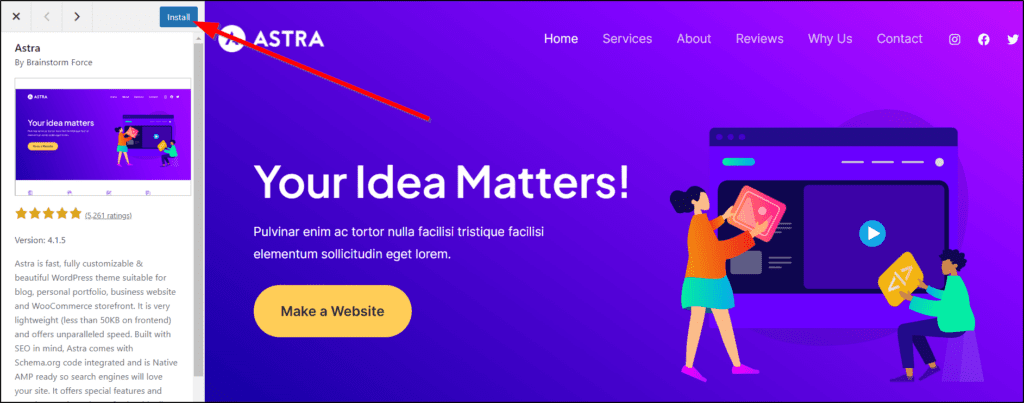
You can access WordPress themes from its Theme directory in your site’s dashboard.

In the themes section, you’ll see the default WordPress themes already installed on your site. They’re pretty neat and customizable. But if you want to add a new theme, click Add New.
This takes you to the official WordPress theme directory with thousands of themes for all kinds of sites.
You can use These free themes by clicking the install button next to them.
Which free theme do we recommend? Astra is a great choice because of its diverse and robust customization features.
But generally, look for the following qualities in any theme before using it:
- It should have hundreds of 4-star plus reviews.
- Should be compatible with the latest WordPress version.
- Should be responsive (mobile friendly)
You can check these things on the theme’s installation page. Pay close attention to the reviews and see if people have complained about the theme’s slow speed or security issues.
Plus, make a quick Google search to see if the theme has any known faults.
If all seems good, go for it.
Follow your theme’s documentation to set up your homepage, logo, and other basic site settings.
Step #4: Install A WordPress LMS Plugin
Now, it’s time to install a WordPress LMS plugin to add an online school to your site where you can host courses and subscriptions.
You can use any WordPress LMS plugin, but let’s go with LifterLMS for demonstration because it’s free.
- Go to your WordPress dashboard.
- Click Plugins → Add New
- Type”LifterLMS” in the search box on the Plugins page.
- Click the Install Now button next to the LifterLMS plugin.

- Click Activate.
You can now find LifterLMS in your WordPress dashboard menu.
Now, you’re ready to create your first course with LifterLMS.

Step #5: Create Your Online Course
LifterLMS has a drag & drop online course builder that enables you to create any kind of online course in WordPress.
First, click on LifterLMS in your WordPress admin section to go to its dashboard.

This dashboard gives you a snapshot of your courses, membership programs, and digital products created with LifterLMS.
Click “Create a New Course” to get started.
LifterLMS takes you to your WordPress editor, where you’ll create your course content. So, if you’re familiar with WordPress (even if you’re not), creating a course should be a breeze.

This is your course’s homepage, where you’ll share its content, description, modules, price, and other details.
As you can see, it uses the usual WordPress content blocks for headings and content. Put your course name in the title, add a featured image and a course description.
You can access the basic settings of your course, like who can access it, from the options panel on the right.
Next, create the course content organized into modules and lessons using the Course Builder.

LifterLMS Course Builder uses visual drag & drop content blocks allowing you to create new course sections (modules) and lessons.
Each module can have as many lessons as you want.
On the other hand, a lesson is a specific piece of content like a video, an audio, an article, or a PDF file.
LifterLMS gives you several options for every lesson.
For example, you can set a passing grade without which the student cannot access the next lesson.
You can also assign weightage to a lesson so that completing it earns the student points added to their overall score.
Similarly, you can offer a course for free as drip content on a specific date or after a certain number of days.
You can also create quizzes and assignments using the lessons setting area. Lifter’s free version offers three quiz types, but the paid version has more options.
Here’s an example of what a LifterLMS course looks like:

Using this course builder, you can create comprehensive courses with multiple modules and numerous lessons.
For example, if you have a freelance writing course, your modules could be:
Module 1: How search engines work
Module 2: The Fundamentals of SEO
Module 3: Keyword Research
Module 4: Content Creation
Module 5: On-Page SEO
Module 6: Off-Page SEO
Module 7: Technical SEO
As you create courses with LifterLMS, they’re automatically listed on a dedicated Course page of your site, like this page on WP101 academy created with LifterLMS.

The best part about using a WordPress LMS like LifterLMS, LearnDash, or any other plugin is that you retain the default WordPress customization capabilities to tailor your student’s learning experience and create a consistent design across your site.
Step #6: Set Up A Payment Gateway
Now that you’ve created your course, it’s time to integrate a payment gateway so customers can purchase your courses.
LifterLMS supports PayPal, Authorize.net, and Stripe Payments. But they come as paid add-ons. So, if you want to accept credit cards through Stripe, you must purchase LifterLMS Stripe Add-on.
You can also configure payment through WooCommerce by integrating WooCommerce payment with LifterLMS. But, again, it’s a paid add-on feature.
Step #7: Create A Sales Page For Your Course
LifterLMS creates two kinds of pages for every course.
- Its dedicated landing page contains the course description, content details, modules, and registration button.
- A Courses page listing all your courses.
So, you don’t need to create a separate landing page to promote your courses. If you’re not happy with the structure of a course’s landing page, simply customize it from the course builder, as we showed you earlier.
Step #8: Promote Your Online Course
Finally, it’s time to start promoting your online course.
And this is where WordPress really shines because it integrates with almost every marketing and business application.
For example, you can use an SEO plugin like Yoast SEO or RankMath to optimize your content for search engines.
Similarly, you can install Sumo or OptinMonster to create sign-up forms, pop-ups, welcome mats, and quizzes to convert your website visitors into email subscribers.
Then you can integrate your site directly with ConvertKit, MailChimp, or any other leading email marketing tool to manage leads, create landing pages, offer lead magnets, and configure automated email sequences.
We’ve written a detailed article on ways to promote an online course where you’ll find several methods to spread the word about your digital products.
Are You Ready To Sell Online Courses On Your Site?
WordPress offers so much flexibility and features that hosting your online course website on any other platform just doesn’t seem right. So, personally, we prefer taking the WordPress LMS route to retain complete control of your content and offer a consistent student experience.
But don’t get me wrong. We’re huge fans of Thinkific, Kajabi, and other online course platforms. But we strongly recommend using them solely to host your course content and keep your site, blog content, and all other business assets on WordPress.
If you have any questions, don’t hesitate to reach out.

Jeff Cobb, Founder of Learning Revolution
Jeff Cobb is an expert in online education and the business of adult lifelong learning. Over the past 20+ years he has built a thriving career based on that expertise – as an entrepreneur, a consultant, an author, and a speaker. Learning Revolution is a place where Jeff curates tips, insights, and resources to help you build a thriving expertise-based business. Learn more about Jeff Cobb here.
Table of Contents
Related Posts
11 Best Web Hosting Services for Creators and Experts
The Big List of Free Training for Course Creators
LearnDash vs LifterLMS | Which Is The Best WordPress LMS (2023)