
TL;DR — How StreamYard Works With YouTube
StreamYard lets you go live on YouTube with a more polished, TV-style setup—without using complex software. You can add guests, branding, banners, tickers, screen shares, and custom layouts, all from your browser. It’s built for creators, educators, and businesses that want professional-looking YouTube Live streams without technical hassle.
Starting price: Free plan available (with StreamYard watermark and limits)
Paid plans start at $25/month (Core plan, billed monthly)
YouTube channel support:
Connect multiple YouTube channels
Stream to 1 channel on Free, up to 3 destinations on Core, and up to 8 destinations on Advanced (destinations can include multiple YouTube channels, Facebook, LinkedIn, etc.)
How to live stream on YouTube with StreamYard (quick steps):
– Connect your YouTube channel as a destination
– Click Create → Live Stream
– Add title, description, and privacy settings
– Enter StreamYard Studio
– Add your camera, mic, guests, branding, and overlays
– Click Go Live on YouTube
Try StreamYard For Free
Have you ever wondered how some YouTube Live videos look more professional and contain tickers, news-style slides, brand logos, and multiple on-screen participants? When, in comparison, your YouTube live streams may look like regular amateur videos?
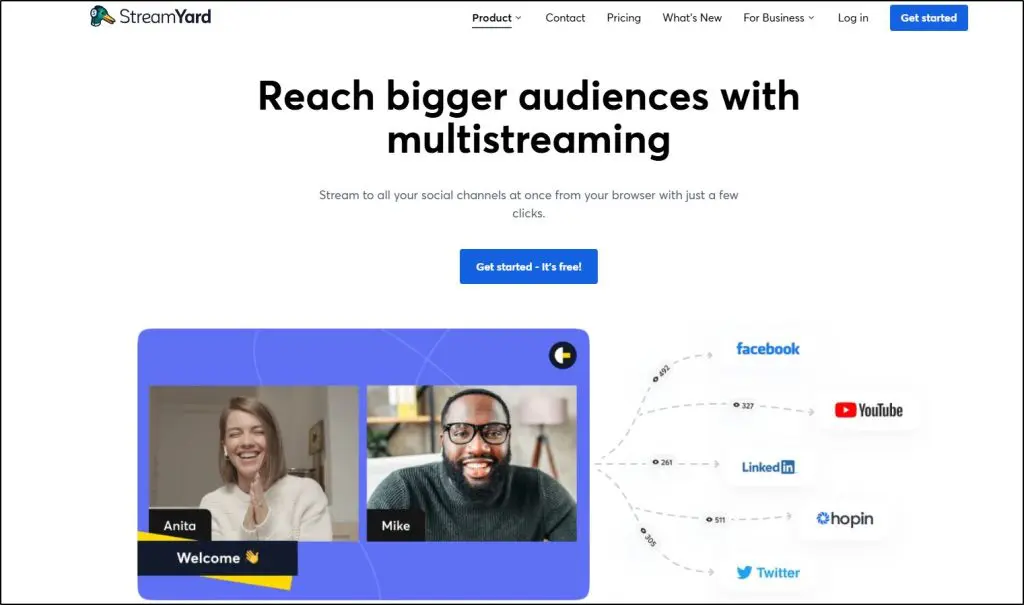
If you want to give the same polished look to your content, you should consider an online video streaming platform like StreamYard.
StreamYard integrates with your YouTube account and offers tons of video production features to make your content more professional and engaging.
In this article, we’ll show you how you can live stream on YouTube using StreamYard to grow your online course business.
Let’s get started.
How To Stream On YouTube Live With StreamYard
StreamYard is among the most user-friendly live video streaming platforms for non-technical users. Most of its functions are pretty straightforward and don’t take more than a few minutes to set up.
So, if you want to use StreamYard with YouTube Live, follow these steps and you’ll be good to go.
Step #1: Set Up Your YouTube Live Account
The first step is to set up and configure your YouTube channel and Live account. YouTube Live is a free live-streaming service to broadcast your content online.
If you have a Google account, you’ll already have a YouTube profile. So, just head to YouTube, sign into your account, and set up your channel.
You can read our detailed step-by-step guide on setting up a YouTube channel if you need more guidance.
Once your channel and Live account are ready, it’s time to set up your StreamYard account.

Step #2: Sign Up For A StreamYard Account
StreamYard is a world-class live streaming and video recording platform that simplifies online broadcasting. You can learn all about its features and capabilities in our detailed StreamYard review.
Go to StreamYard’s website and sign up for a free account using your email address or Google Account.
Although you can use StreamYard with YouTube for free, we’d strongly recommend signing up for one of its premium subscriptions to access all its video enhancement and broadcasting features.
Once you create an account and sign in to StreamYard, you’ll be able to connect your YouTube account and start new live streams.
We’ll show you how.
Step #3: Connect Your YouTube Channel
In your StreamYard dashboard, click on Destinations in the left menu.
StreamYard is a multistreaming platform, which means it allows you to stream videos live on multiple social networks and websites from a single source.
But since we’re talking about connecting to YouTube right now, click the YouTube button in the destination network list.
This will take you to the sign-in page of your Google account, where you’ll choose the relevant email from the list.
Next, StreamYard will request specific permissions to access your YouTube account (don’t worry, it’s safe).
Once you click the Allow button, your StreamYard and YouTube accounts will be linked, and you’ll see the following message in your StreamYard dashboard.

With StreamYard, you can connect multiple YouTube channels to your account. So, let’s say you have another YouTube channel associated with a different Google account.
To broadcast live from StreamYard to multiple YouTube channels, repeat the process we’ve already described.
Once you’ve added your YouTube channels, it’s time to configure your broadcast.
Step #4: Configure Your Live Stream Settings
To start live streaming with StreamYard on YouTube, click the Create button in your account dashboard.
StreamYard allows you to broadcast live streams or record a video using its studio and schedule it for streaming.
But since we want to go live on YouTube, choose Live Stream from the Create menu.

Next, StreamYard asks whether you want to do a real-time live stream or broadcast a pre-recorded video.
Right now, we’re looking to start a real-time live stream, so we’ll choose the Studio option.
We’ll discuss StreamYard Studio in more detail later, but it is your central control panel from where you’ll create and manage your live stream and configure the look & feel of your videos.
But before entering StreamYard Studio, you must choose your video title, description, and privacy settings.
These settings apply directly to your YouTube broadcast because StreamYard can access your account. If you want to broadcast publicly on your YouTube channel, leave the default privacy option in place.
But if you want to host an invite-only broadcast or a live session for your course members, keep your privacy settings as Unlisted or Private.
If you’re hosting your live stream immediately, click Create Broadcast to enter StreamYard Studio.
But if you want to schedule the stream for later, enter the relevant time and date.
If you create a scheduled stream, you’ll still be redirected to StreamYard Studio, but your content won’t immediately go live.
Before entering the Studio, the final step is to check your mic and camera performance and enter your display name.
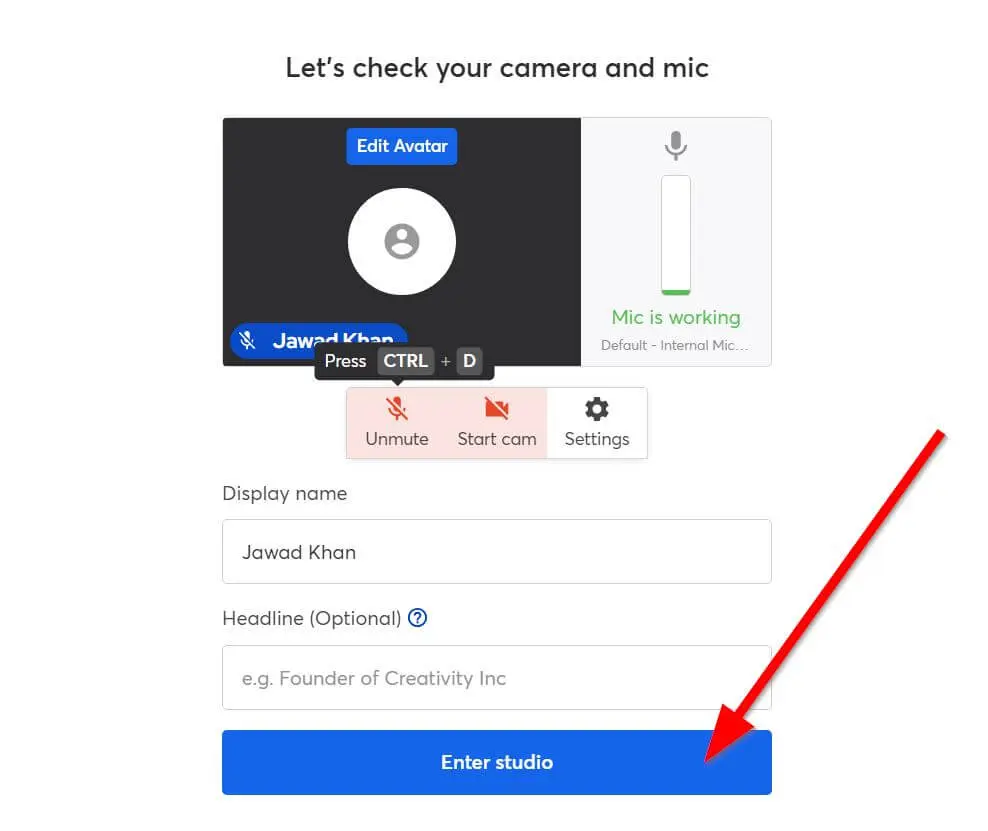
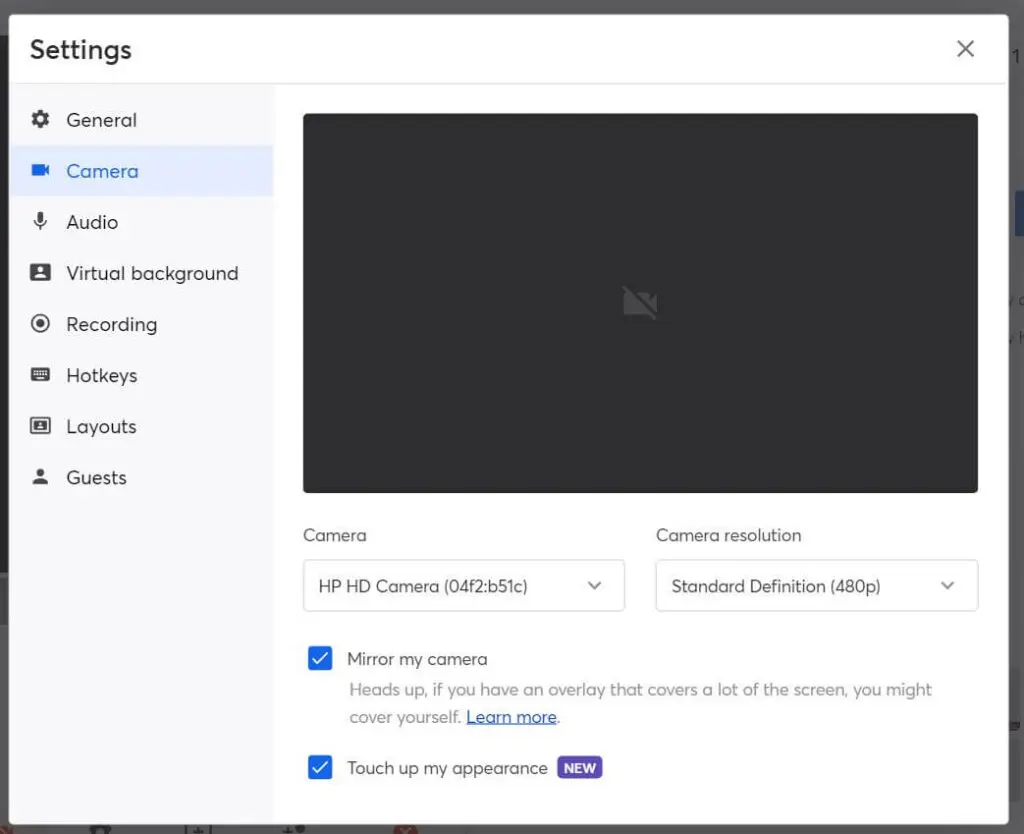
Go to the Settings section for mic selection and configuring your video quality.
You can also choose from multiple virtual backgrounds or set up a green screen for your videos to apply more effects.
Once you have configured all the settings, click Enter Studio.
This completes your YouTube stream settings from StreamYard.
Next, you’ll use StreamYard Studio to polish your content and make them stand out.
Step #5: Polish Your Content With StreamYard
StreamYard Studio has many features to make your videos more engaging and professional.
So, once you enter the Studio, you’ll see this interface.

All the main features and options are available on the right panel of your screen. But first, you must add your video to the stream by clicking in the lower-left corner of your screen.
StreamYard allows you to switch between cameras and add multiple screens to your stream this way.
You can also modify your stream’s layout by clicking the templates below your video player. Each template is designed for a different scenario. For example, there’s a single-screen template, a template for two speakers, a layout for multiple speakers, and a split layout.
Next, you can use the branding features in the right panel to add your logo to the stream, change your player’s color theme, and add a background image.
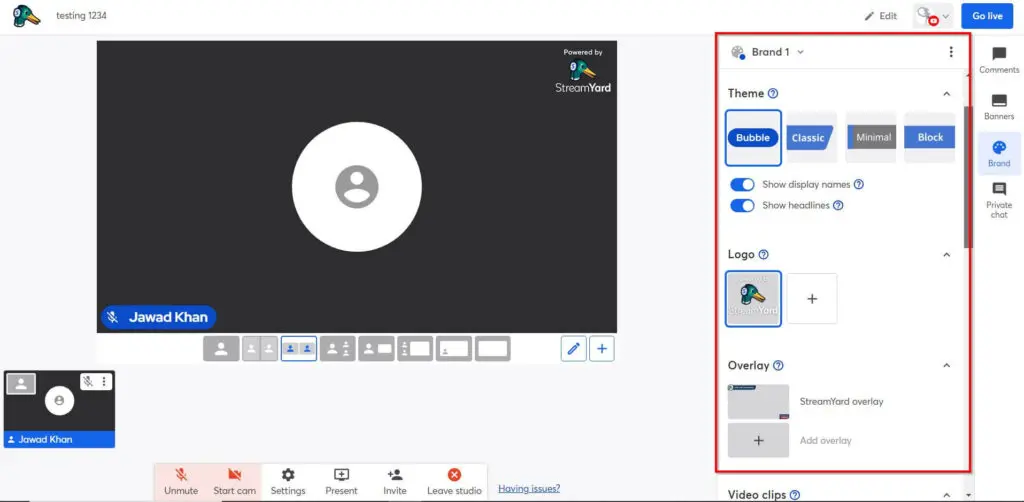
You can use the banners and tickers feature to display additional information or context for your viewers or make announcements.
In addition, you have the option to apply transition effects or include welcome screens to make your stream look more engaging.
All these features combine to make your content look more professional than a regular YouTube live video.
Once you’re satisfied with your video’s appearance, it’s time to do a test run.
Step #6: Test Your Stream
Before going publicly live on your YouTube channel, we recommend running a test stream to ensure your broadcast works exactly how you want.
To do that, change your stream privacy setting to private in StreamYard Studio.

Go to the Privacy dropdown, choose “Private”, and click Save Changes.
Now, your stream will not be visible to your YouTube channel’s subscribers. To start the test stream, click Go Live.
When you click this button, your StreamYard broadcast will begin on YouTube Live.
Now click on your profile icon and select “View on YouTube” from the menu to watch your video live on YouTube.

We recommend you copy your YouTube video’s link and watch it on your smartphone to ensure the stream works smoothly.
Step #7: Go Live On YouTube Using StreamYard
Now that you’re satisfied that your broadcast is working the way you want, it’s time to go live publicly.
Again, click on the Edit button in StreamYard Studio, change the stream’s privacy settings to Public, and save the changes.
Now, click the Go Live button to start streaming on YouTube with StreamYard.
During your stream, have at least one team member join as a viewer from another computer, preferably using a different internet connection. This would help you identify and address any user experience issues in time.
And finally, when your live session is finished, click the End Broadcast button to disconnect.
That’s all to live streaming on YouTube with StreamYard.
How To Live Stream Pre-Recorded Content On YouTube Using StreamYard
Apart from real-time live streams, StreamYard also allows you to broadcast pre-recorded videos as live events to your YouTube audience.
Here’s how you can do it.
The first three steps will be the same as described in the previous section. Once you set up your YouTube channel and connect it with StreamYard, let’s now configure your pre-recorded stream.
Go to your StreamYard dashboard and click the Create button.
Once again, choose Live Stream from the options list.
This time, choose “pre-recorded video” instead of Studio.
Now select a recording for your stream.
StreamYard allows you to upload a video file from your computer or use one of your past StreamYard broadcasts as a pre-recorded stream.
We prefer using past broadcasts because they were created with StreamYard and have all the professional video elements.
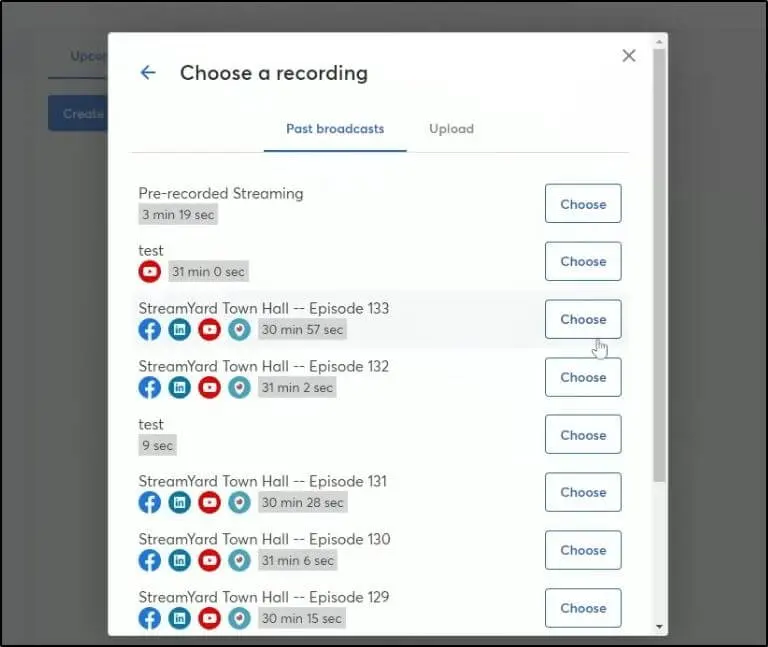
Just click the Choose button to select any past broadcast for your pre-recorded stream.
If you’ve connected your YouTube channel with StreamYard, its icon will appear in the Destinations section. Choose your broadcast platform from this list and configure your stream settings.
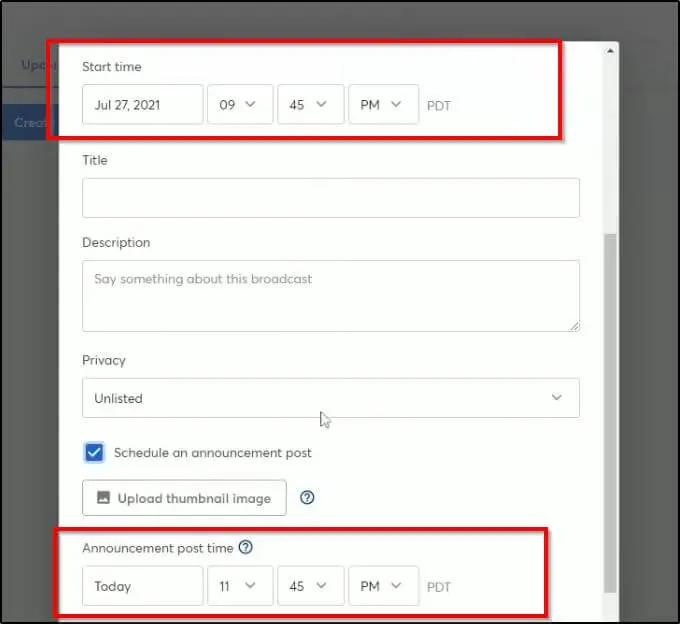
Start Time is when your pre-recorded stream goes live on YouTube, while Announcement post time is the automated post you’ll send to your social networks to announce your stream. Ideally, the announcement post should be scheduled a few hours before your stream time.
Next, give your stream a title and description, choose its privacy settings, and create your pre-recorded broadcast.

You have now successfully scheduled your pre-recorded stream from StreamYard to YouTube. It will go live at your scheduled time without you doing anything more.
However, if you think you’ll get comments or questions from your audience, it’s better to be there live in the comments section and engage with your viewers live.
Why Use StreamYard To Live Stream On YouTube?
We’ve described the step-by-step process of using StreamYard with YouTube. But why use StreamYard in the first place? Why not stream directly from YouTube?
It’s free, it’s easily accessible, and it’s unlimited, unlike StreamYard.
You’re right.
YouTube is the most popular live-streaming platform, and regular internet users should prefer it over StreamYard.
However, if you’re an online course creator, a digital product seller, an e-learning professional, or anyone who wants to grow their brand with video streaming, StreamYard is the better option for several reasons.
Reason #1: StreamYard Creates More Professional Content
Unlike YouTube, StreamYard gives you several video enhancements to give your content a more professional and polished look. For example, you can fully brand your videos with your logo and theme colors. Similarly, you can add announcement tickers, information cards, and graphic elements like screen overlays to your content.
In addition, StreamYard gives you transition effects, waiting screens, stock videos, and multiple camera options to create high-quality content. You can also change your stream’s layout and invite multiple on-screen guests to create more engaging and valuable videos.
And finally, you can use a green screen or virtual backgrounds with StreamYard.
These features combine to transform ordinary videos into high-impact content that positions you as an expert in your niche.
But most of them are not available in a regular YouTube stream.
Reason #2: StreamYard Allows Multistreaming
StreamYard allows you to broadcast your content to more than eight social networks and third-party platforms simultaneously (Core and above plans). In addition, you can use its RTMP custom stream option with OBS to stream your videos on many other sites.
In comparison, YouTube doesn’t offer multistreaming features. You can embed your YouTube stream player on other sites, but can’t directly broadcast native streams on Facebook, Twitch, LinkedIn, etc.
Reason #3: Manage YouTube Comments From StreamYard
StreamYard provides you with a central chat interface where the comments from all your connected YouTube channels and other destinations appear. So, you don’t need to switch tabs to see comments on Facebook and YouTube.
Plus, you can respond to those comments from StreamYard’s chat window, and they’re sent to the relevant destination.
This drastically improves your audience engagement and helps you respond to comments much faster.
Reason #4: Share Your Desktop View With Your Audience
You can use StreamYard as a screencasting tool as well. It lets you share your desktop view, a specific window, or a tab during your live stream.
This feature comes in handy when you’re conducting a live online class or a presentation for your audience. In fact, StreamYard also has a presentation feature where you can upload PowerPoint slides to your live stream.
Using the different screen layouts in StreamYard, you can make these presentations and screencasts more engaging, showing the presenter in one part of the window and your screen in the other half.
Ways To Use StreamYard To Grow Your YouTube Audience
You’ve learned how to use StreamYard with YouTube for live streaming, great. But now, you want to grow your YouTube audience using high-quality live streams, right?
Here are a few tips to help you get started.
Host YouTube Live Sessions Regularly
If you want people to show up in your live sessions and eagerly wait for your shows, you must stream regularly. Commit to a practical streaming frequency that you can consistently follow.
For example, you can do an hour-long live broadcast every week. Or you could go for two sessions a week, one 60-minute long and the other for a quick 15-20 minutes.
You can also add pre-recorded streams to the mix to reduce your workload while giving your audience valuable content.
For example, you can batch record a few videos using StreamYard and launch them one by one every week, along with your regular live stream session.
Whatever frequency works for you, stick to it so your audience knows when you go live and attend your sessions.
Livestream On Multiple YouTube Channels
StreamYard allows you to broadcast on multiple YouTube channels simultaneously. Take advantage of this feature to maximize your content’s reach.
For example, if you manage your personal and company channels separately, consider going live on both of them at the same time.
Or, if you have industry partners or other creators looking to collaborate, you can ask them to broadcast your streams on their channels.
Apart from YouTube, broadcast your content to Facebook, LinkedIn, and any other platform relevant to your audience. Doing this would help you bring users from other sites to your YouTube channel and grow your brand’s influence.
Use CTA To Grow Your Email List
Live streams are among the best ways to attract email subscribers and leads for your online education programs because viewers are much more engaged in live content than recorded videos.
Using StreamYard, you can transform your engaged viewers into email subscribers in a number of ways.
For example, you can use the tickers and banners feature to ask your viewers to visit your site or landing page. Just paste your landing page URL in a banner and display it on your screen. Those links aren’t clickable, but you can paste them in the chat box and ask your viewers to visit to sign up.
Similarly, you can share your screen, show your viewers what they’ll get by signing up to your email list or free email course, and then guide them through each step of the signup process.
In short, keep reminding your viewers to become subscribers because building an email list is the best way to grow your online education business.
Repurpose Your YouTube Live Streams Into Shorts
Once your live stream is complete, you can turn it into YouTube Shorts or smaller clips to gain more exposure.
For example, if your regular live stream is 60 minutes long, pick 5-10 best moments from your show and turn them into individual video clips for your YouTube channel.
Similarly, you can use StreamYard’s repurpose feature to create YouTube Shorts directly from your account.
The advantage of using StreamYard for repurposing is that your videos will contain enhancements and visual features. Plus, StreamYard allows you to edit your Shorts before uploading so that you can add captions or any other visuals.
Host Group Podcasts And Mastermind Sessions
One of the best YouTube growth hacks is collaborating with other creators, inviting them to your shows, or getting featured in their content.
With StreamYard, you can do this easily by hosting multiple guests in your video podcasts or mastermind sessions.
You can invite the best minds from your industry to discuss your audience’s problems, offer solutions, and show them the way forward.
Invite Your Successful Customers On Stage
If you want to convince people to buy from you, show them your results and other successful people who’ve used your products to grow their businesses.
With StreamYard, you can do that by inviting people from your audience on-screen and giving them the center stage.
They can share their experience of using your product and answer your audience’s questions to address their concerns.
It’s a proven way to turn skeptical leads into lifelong buyers.
Are You Ready To Use StreamYard To Live Stream On YouTube?
As we’ve shown you in this article, using StreamYard with YouTube is pretty straightforward. Even if you’re a free StreamYard user, you can easily connect your YouTube channel and use StreamYard’s video enhancements to create high-quality and professional content.
However, if you want to experience the full range of StreamYard’s capabilities, we strongly recommend choosing one of its premium plans.
Let us know if you have any questions, in the comments section.

Jeff Cobb, Founder of Learning Revolution
Jeff Cobb is an expert in online education and the business of adult lifelong learning. Over the past 20+ years he has built a thriving career based on that expertise – as an entrepreneur, a consultant, an author, and a speaker. Learning Revolution is a place where Jeff curates tips, insights, and resources to help you build a thriving expertise-based business. Learn more about Jeff Cobb here.
Table of Contents

Really enjoyed your insights on how to Live Stream using StreamYard. I’ve seen similar strategies work well while promoting technical training content like OpenShift Online Training. Thanks for sharing such valuable information!