You don’t have to spend much time online to realize that video is one of the dominant forms of content these days. Whether your aim is to start a YouTube channel, create online courses, or just add to the variety of content on your website, knowing how to create compelling video can really give you an edge.
And the same goes for live streaming, Webinars, and other virtual events. These, after all, are just another form of video and knowing how to make yours stand our can make all the difference in the increasing competition to build and maintain an audience.
A high-quality microphone and camera are, of course, essential video creation tools, but another tool that is often overlooked – or used poorly – is a green screen. Making a green screen a part of your video studio set up really expands the flexibility and range of options you have when shooting and editing – but you have to know how to do it right.
So, if you have been wondering about green screens and how to use a green screen for video, this article has you covered. Read on for a better understanding of what a green is, what it can do for you, and how to use a green screen effectively.
What Is a Green Screen and How Does It Work?
A green screen is a way of taking advantage of chroma keying, a technique that involves using of a block of a particular color – most often blue or green – in a video image so that it can be replaced by another image or color.
When you shoot video with a green screen in the background, that background can be made transparent if your camera – or, these days, more likely the software you use to shoot and edit – is “keyed” to essentially ignore the colors within that range of green. This means you will see anything that is not within that range when it is placed in front of the background, but you won’t see the background itself.
If you have ever watched a weather person on the evening news, then you have seen a green screen in action. All of those cold fronts and storm systems swirling around behind the person telling you about tomorrow’s weather are actually images imposed upon a green screen. Turn those images off and all you would see is the weather person against a field of bright green.
As the weather person scenario suggests, this can be done in real-time, while filming. It can also be done after filming, using editing software like Camtasia or Screenflow.
In the past, green screens were always made of physical material – usually some form of cloth that is mounted or hung to form a backdrop. These days, green screens can be virtually generated by software – a capability you will find in popular platforms like Zoom or OBS Studio.
In my experience, though, the virtual green screens still usually leave a bit to be desired. With good lighting and a plain background behind you, they can do a reasonable job, but throughout this article, I really have a good, old-fashioned physical green screen in mind.
Why Is a Green Screen Green?
Naturally, you don’t really need to know the answer to this question to use a green screen, but it’s hard not to be curious.
Green is the most common color used for green screens because it’s the furthest away from most human skin tones on the color spectrum. This makes it easier to key out or remove in post-production.
That said, you can really use any color for a green screen so long as it’s uniform and different from the subject matter in your video. For example – and as already mentioned – you could use a blue screen. You would just need to make sure there aren’t any other blue elements in your video. (Avoiding the semi-florescent shade of green used in most green screens tends to be a lot easier, in my experience.)
So, are there situations where a blue screen might be better than a green screen?
Yes. For example, if you or whoever you are shooting has light blond hair, it can be hard to keep the green from a green screen from “bleeding” into it when you shoot. In general, if you are seeing green consistently bleed into whatever you are shooting, it may be worth considering a blue screen.
All of that said, most modern digital cameras are designed to work best with green, so using any other color is likely to be a fairly rare exception.
How to Set Up a Green Screen
Here’s where things start to get tricky.
It’s pretty easy – at least at a basic level – to understand what a green screen can do for you.
And getting a green screen isn’t all that hard. Go to Amazon or B&H Photo, and you can find plenty of relatively low-cost options – like this one. Or, you can decide to be a bit more professional and get something like the Elgato green screen (which is what I currently use). You can even buy green chroma key paint and turn a wall in your home or office into a green screen.
However you go about it, the green screen itself isn’t all that complicated. It’s using the green screen in a way that doesn’t look amateurish that is a bit harder – but still very far from rocket science. So, here are a few green screen tips, based mostly on my own experience.
- Set the green screen up in a room where you have as close to complete control over the light as possible. So, if there are windows, you ideally want to be able to completely block the light coming from those windows.
- Make sure the green screen is as wrinkle free and smooth as possible and is secured to not move around at all – for example if the air in the room stirs because someone opens a door. You may need to iron the green screen or use a steamer like this one (which is what I use for all my cloth backdrops).
- Make sure the green screen is well and uniformly lit. (If you can’t ensure uniform light across the entire green screen, at least make sure the part that is most visible in the camera is well and uniformly lit.) I highly recommend investing in LED lights specifically for this purpose – like the ____ lights you can see lighting my green screen in the image below.
- Assuming you or someone else will be speaking/presenting in the foreground, I recommend having a light source above and behind you (but out of the camera’s view). This will help create sharper separation between you and the green screen so that whatever image you impose on it as a background will look more natural.
Everything above helps you avoid the situation you have probably seen on Zoom many times when the edges around a speaker using a green screen seem to blur, cut out, or look greenish. Of course, you also need to pay attention to what is going on with your camera and any recording software you are using. So, let’s move on to that.
How to Shoot Video with A Green Screen
Getting your green screen set up properly is essential, but there are also important details to pay attention to while shooting. These include:
- Make sure the subject you are shooting – which may very often be you – is positioned at least three feet in front of the green screen. Like the back lighting mentioned above, this helps draw a sharper distinction between you and the green screen and prevent you from being surrounded by a green haze – especially whenever you move while being filmed.
- For presenters, avoid wearing anything with green in it, even a shade of green that is different from the green screen. Also avoid shiny clothes – these can mess with your lighting and cause green to bleed in. It’s also generally best not to wear a headset as it is very difficult to get the lighting set up well enough that you won’t see some green in the space between the headphones and your hair or see parts of the headset disappear and reappear as you move.
- Even with a properly set up and well-lit green screen, it’s usually best to move around as little as possible. Every movement creates opportunities for blur and bleed.
- As a general rule, the higher resolution camera you are able to use, the better. 4K is going to process the colors in a green shoot better than HD, which will process better than standard definition, etc.
- Speaking of processing – capturing video with a green screen involved can require significant processing power. Particularly if you are processing video live – e.g., through a Zoom meeting or an OBS live stream – you want to be sure have anything you don’t really need on your computer shut down in order to free up memory and processing power.
- Also important in live situations, make sure you have configured whatever software you are using when shooting to take the green screen into account. With Zoom, for example, you want to make sure you have checked “I have a green screen” under Background & Effects. Or, with OBS, make sure you have actually added a chroma key filter.
You can also find a fair amount of debate out there about the frames per second (fps) you should shoot at or the ISO (basically, light sensitivity level) you should use. I won’t pretend to have the expertise to answer those questions and I suspect they get more into the weeds than the average expert hoping to shoot a course or a marketing video is going to want to get into. In my experience, most reasonably modern video cameras will auto adjust to provide setting that, if not absolutely optimal, will work in most situations.
How to Use a Green Screen for Video Editing
If you use a green screen when live streaming, most of what you do with it will happen during the live sessions and be captured as part of the recording.
So, for a simple situation in which you use a green screen with Zoom, you simply follow the steps above, upload/select the background you want to use in the Backgrounds & Effects area, check “I have a green screen,” and then go about using Zoom as you normally would. If your session is recorded, then whatever background you selected to impose over the green screen will show up in the recording.
Things can get more complex with a live streaming platform like OBS, where you may want to change backgrounds throughout a session, load slides, or bring in additional layers of images – like, for example, your logo or the cover of a book you have published – at different points. Still, all of this will be captured in the recording and you won’t likely do any editing specific to the green screen.
In other case – like, for example, when you are shooting an online course – it will likely be during editing that you take advantage of what a green screen can offer. Pretty much all major video editing tools will give you options for working with green screens, but I’m just going to highlight the basic steps for a couple that are especially popular with course authors and other types of educational product creators: Camtasia and Screenflow.
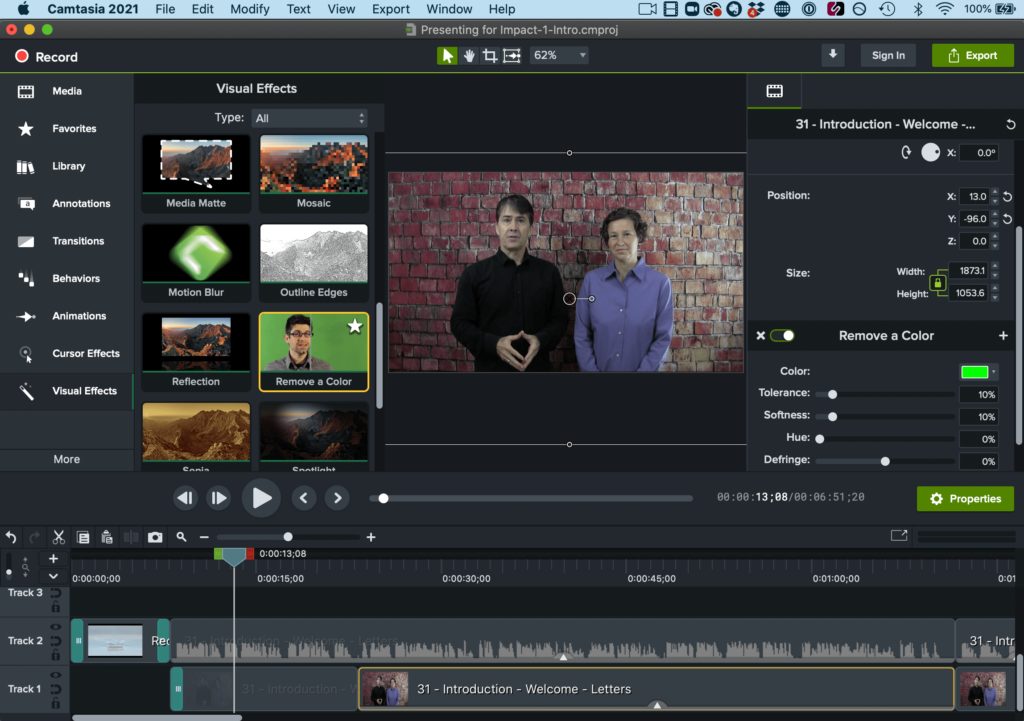
In Camtasia, once you have imported your video shot with a green screen, you’ll want to drag that video into your project, click on Visual Effects in the left navigation (click More if you don’t see it).
Next, drag Remove a Color onto your video clip. (If you don’t see Remove a Color, try right clicking in the Visual Effects menu and choose Restore Default Effects. This is a known issue in Camtasia.) By default (in my experience) the standard green screen chroma key will be applied by default. This will make your green background disappear an enable you to insert any image you like to replace it.
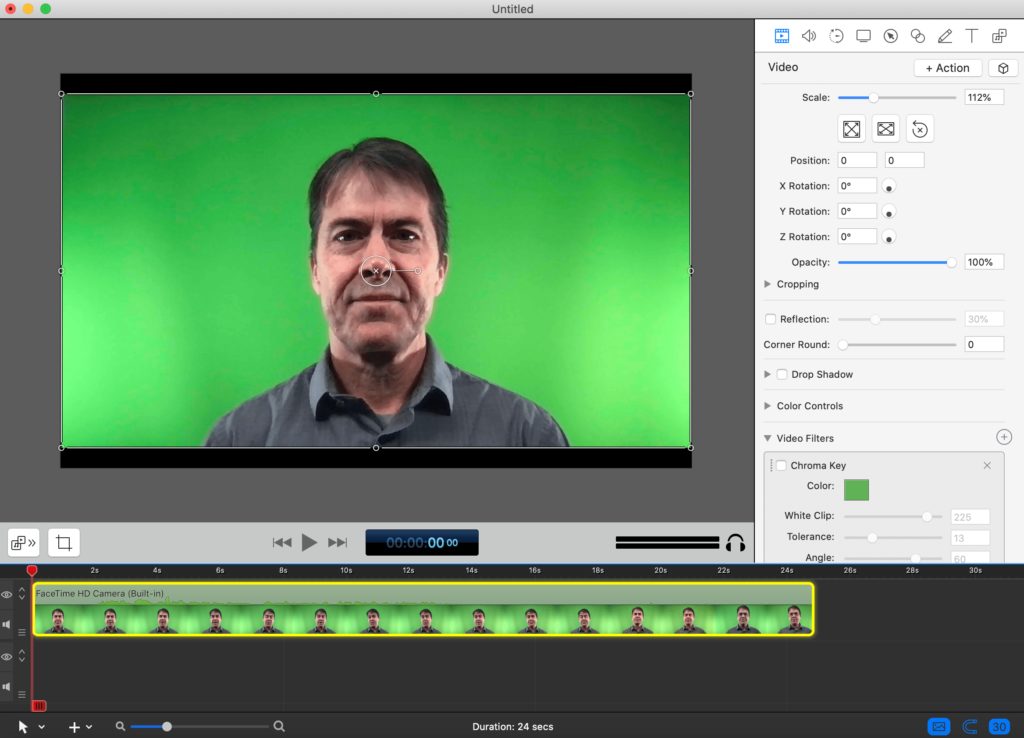
In Screenflow, import your video clip, drag it into your project, and select it. Then, click the video icon in the Inspector, click “+” in the Video Filters area, and select Chroma Key. Like Camtasia, Screenflow defaults to the standard green screen color and once you check the Chroma Key box, your green background will disappear and can be replaced by whatever images you choose.
Benefits of Using a Green Screen
Okay, I know – all of this may sound like a hassle. So, why not just find a reasonable well-lit place with an attractive background and shoot videos with your phone, like you always have?
Truth is, you can still do that in many instances – maybe even most – but adding the capability to use a green screen can help you up your game significantly. And, as noted back at the beginning of this article, that matters more and more in a world where the competition for gaining your prospects attention – much less getting them to whip out a credit card – is getting higher and higher.
Here are some of the benefits of using a green screen:
1. Decreases Barriers, Increases Flexibility
A key reason I have gravitated toward using a green screen is that I don’t always want to shoot with the same background but moving video equipment around is a pain. It may be silly, but I find that even small barriers can lead me to either shooting the same way as always – which gets boring both for me and for viewers – or not shooting at all.
I prefer to have one set place where I know I can just walk in and shoot. Having a green screen as part of that set up means I have full flexibility for “where” my video takes place without the barrier of actually having to relocate myself.
2. Creates a More Professional, Polished Look
Videos with a properly used green screen generally have a more polished and professional look than those without one. That’s because you have much more control over the environment in which your video is shot.
Keep in mind that consumers – including consumers of courses and other digital products – often choose larger brands over smaller ones because of the production quality. Rightly or wrongly, higher production value leads to increased perception of value.
3. Adds Visual Interest
You can add text overlays and other effects to your videos without necessarily using a green screen, but with a green screen background, your options increase dramatically. You can easily swap out backgrounds, whether just for a change of scenery or to make easier for viewer to see specific graphics that are important to your content.
4. Saves Time and Money
Video production is often expensive because you may need various props and scenery. With a green screen, you won’t need to rent a studio or hire a crew to film your videos.
You can set up your green screen in any location, which makes it a convenient option for small businesses or anyone with a limited budget.
5. Boosts Your Brand
All in all, a green screen is an invaluable tool for helping you elevate your brand cost effectively – and a strong brand is essential for business success.
As I’ve written previously about how expertise, authority, and trust – all core elements of a strong brand – are key factors for showing up high in search results on Google.
And a strong brand not only adds credibility but also makes consumers more willing to spend more money. Data shows that 46% of consumers are willing to pay more for brands they trust.
Naturally, a green screen in and of itself doesn’t create credibility, but it greatly expands your possibilities and capabilities for creating content that conveys your expertise and authority and foster trust with your audience.
Bottom Line: A Green Screen is Worth It
While it’s true that we’ve all seen plenty of people on Zoom using green screens badly, the truth is, it just doesn’t take that much to use one well. Once you do, you’ve got a serious edge over most people – including most of your competition.
So, if you are serious about building a business based on leveraging your content into courses, live streams, and other digital offerings, learning to use a green screen well is among the highest leverage investments you can make.
Bookmark this article for reference, give it a shot (so to speak), and if you think of it, share a link to some of green screen content in the comments.
See also:
- 10 Best Live Streaming Software For Multi-Platform Streaming (2022)
- How to Sell Your Online Video Course
- How to Create a Simple Home Video Studio for Online Courses

Jeff Cobb, Founder of Learning Revolution
Jeff Cobb is an expert in online education and the business of adult lifelong learning. Over the past 20+ years he has built a thriving career based on that expertise – as an entrepreneur, a consultant, an author, and a speaker. Learning Revolution is a place where Jeff curates tips, insights, and resources to help you build a thriving expertise-based business. Learn more about Jeff Cobb here.
Table of Contents