
TL;DR: How to Record a PowerPoint Presentation Step by Step (Windows & Mac)
Microsoft PowerPoint has built-in tools that let you record audio narration, video of yourself presenting, and slide timings directly inside your deck. These recordings can be exported as MP4 or MOV, making them ready for YouTube, online courses, or LMS platforms like Thinkific and Teachable. You can re-record individual slides, so polishing a long lesson is simple without starting over.
Steps to Record a PowerPoint Presentation (Audio & Video)
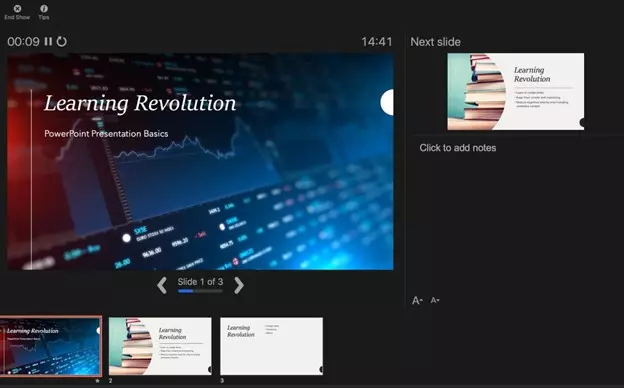
Step 1: Open your presentation → Go to Slide Show → Record.
Step 2: Turn Mic ON → Use the built-in mic for quick demos, or a USB mic for professional-quality course recordings.
Step 3: (Optional) Turn Camera ON → Place your video feed on screen. Resize or move it so it doesn’t block slide content.
Step 4: Prepare Notes & Timings → Use the Notes pane and run Rehearse Timings. Keep narration per slide short (1–2 minutes).
Step 5: Click Record & Present → Deliver your talk slide by slide. Audio and video are saved per slide, so you can re-record just one if needed.
Step 6: Use Annotations → Pen and Highlighter tools let you draw attention to key points while recording.
Step 7: Review & Adjust → Play back slides, clear and re-record sections if needed.
Step 8: Export Your Video → Go to File → Export → Create a Video. Choose MP4 (best for online sharing), 1080p for most courses, 720p for smaller files, or 4K for design-heavy lessons.
Remember:
– PowerPoint saves recordings inside the deck by default — export to MP4/MOV if you want a standalone video.
– The web version of PowerPoint has very limited recording tools — use the desktop app for full audio/video features.
With narration and optional video, PowerPoint transforms static slides into teaching-ready lessons you can use in courses, webinars, or virtual events.
For higher quality screen recordings, Camtasia & ScreenPal are great options.
Need to record a PowerPoint presentation? I’ve had to do this more times than I can count for online courses, client webinars, and even virtual conferences.
And every time, the same questions come up: How do you record narration in PowerPoint? How do you add your video on screen? Where is the recording saved?
While some folks use Google Slides or Keynote, Microsoft PowerPoint is still the go-to tool for educators and course creators. The challenge is that most people never learn the recording side of PowerPoint — so their presentations fall flat once they’re on video.
In this guide, I’ll walk you step by step through how to record audio narration, how to video record yourself presenting a PowerPoint, how to export it as MP4 or MOV, and even how to fix common issues like missing audio or turning the camera on and off.
By the end, you’ll know exactly how to create a presentation that sounds clear, looks professional, and is ready to share in your online course, on YouTube, or at your next virtual event.
For superior presentation recordings, try a top screen recording platform
How to Record a PowerPoint Presentation In Windows & Mac
PowerPoint comes with built-in presentation recording features that let you capture audio narration, video of yourself presenting, and slide timings without extra tools.
These recordings can be exported as MP4 or MOV, making them ready for upload to course platforms, YouTube, or any LMS. Because narration and video are saved per slide, you can re-record individual sections instead of starting over.
This flexibility is invaluable for course creators and consultants who want professional-quality lessons without complicated editing.
Below, I’ll walk through the exact steps for Windows and Mac, so you can record and export your presentation with confidence.
7 Steps To Record A PowerPoint Presentation In Windows
- Open your presentation.

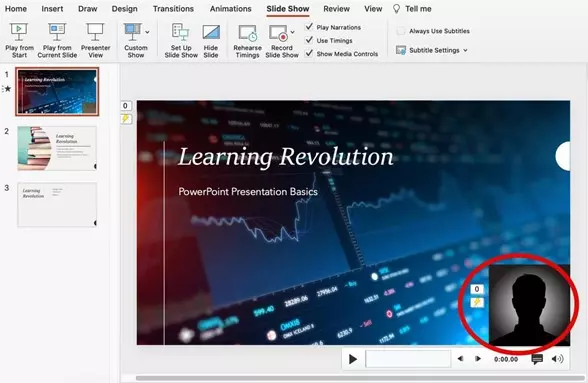
- Go to Slide Show → Record.
- In the Record window, toggle Mic ON (and Camera ON if you want your video on screen).
- Click Record and start presenting. Speak clearly, and leave a short pause before advancing slides so your audio doesn’t get clipped.
- Use the Pen or Highlighter tools if you want to mark up slides while you talk.
- When you’re done, stop the recording. You can re-record any individual slide without starting over.
- Go to File → Export → Create a Video → choose MP4, Full HD (1080p) → Create Video.

(On Windows, PowerPoint exports to MP4 or WMV. MP4 is the safest choice for online courses or YouTube uploads.)
5 Steps To Record A PowerPoint Presentation On Mac
- Open your deck and go to Slide Show → Record.
- Turn Mic ON to capture your narration. If you want your face on screen, also turn Camera ON — then drag and resize the camera frame so it doesn’t cover important content.
- Hit Record and deliver your presentation. Just like on Windows, PowerPoint saves narration and video per slide, so you can redo just one if you need to.
- When finished, go to File → Export → Create a Video.
- Choose MP4 (or MOV) as your format, select 1080p for a good balance of quality and file size, and make sure Use Recorded Timings and Narrations is checked.
(On Mac, MOV works fine for Apple devices, but MP4 is better if you’ll be uploading to a course platform or video hosting service.)
How to Record a PowerPoint Presentation with Audio
I just walked you through the quick steps for recording a PowerPoint presentation with narration. That’s enough to get you started, but if you’re creating course lessons or professional webinars, there’s more to audio than just turning the mic on and hitting record.
In this section, I’ll go deeper and show you exactly how to plan, record, and polish your narration.
Step 1: Open the Recording Tool
Go to Slide Show → Record. This brings up PowerPoint’s Recording Studio, where you can manage narration, mic input, and slide timings.
PowerPoint gives you everything to add voice to your presentation, no external tools needed. Some creators use this to record entire lecture modules, while others record short, standalone lessons they later stitch into a bigger course.
Step 2: Choose the Right Mic
Turn Mic ON and select your input device.
If you’re quickly recording an internal update or practice run, the built-in laptop mic works fine. But if you’re building lessons for paying students, invest in a simple USB mic or headset. Clearer sound reduces listening fatigue and makes your course feel premium. Many instructors I’ve worked with notice higher engagement just by improving their audio setup.
Step 3: Prepare Notes & Timing
Use the Notes pane to jot down talking points instead of reading your slides word-for-word. Then run Rehearse Timings to see how your narration flows. PowerPoint will track how long you spend on each slide.
If you’re creating a structured online course, keep each narrated slide to 1–2 minutes for easier consumption. For corporate training or webinars, you may stretch longer, but pacing matters — too fast and learners get lost, too slow and they disengage.
Step 4: Record Per Slide
Click Record and deliver your narration. Remember: when you record a slideshow with audio in PowerPoint, narration is saved per slide, not during transitions. Always finish speaking before you advance. If you mess up, you don’t need to redo the entire deck — just re-record that single slide.
Step 5: Review and Adjust
Stop recording and play back selected slides. If you need to fix something, use Clear → Clear narration on selected slide and re-record. You can also use the Pen or Highlighter tools while speaking to emphasize important details.
Think of this step as editing in the classroom. Just like you’d circle text on a whiteboard, digital annotations help students focus. Many instructors use this for walkthroughs, highlighting formulas, or pointing out key visuals on a graph.
Step 6: Export with Narration
Go to File → Export → Create a Video. Choose MP4, 1080p, and make sure Use Recorded Timings and Narrations is checked.
MP4 is universally supported — perfect if you want to export your PowerPoint with audio narration for Thinkific, Teachable, YouTube, or any LMS. If your course platform has strict file limits, export in 720p; if you’re showcasing detailed visuals, you can go 4K.
Different creators take different routes: one client of mine uses 720p for mobile learning to save bandwidth, while another prefers 4K for design-heavy tutorials.
Done right, narration turns a deck into a teaching experience. Instead of “reading the slides,” you’re guiding learners in your own voice which is exactly what students expect in a professional course.
Want to sell courses? Here are the best online course platforms
How to Record Yourself Presenting a PowerPoint (with Video)
Adding video of yourself alongside your slides can make your lessons more engaging and personal. Learners connect more strongly when they can see the instructor’s face, gestures, and expressions. Here’s how to do it well:
Step 1: Open the Recording Tool
Go to Slide Show → Record. In the Recording Studio, you’ll see toggles for both audio and video.
For course creators, this is where you decide whether your lesson should feel more like a voiceover lecture or a face-to-face presentation. Some instructors turn video on for welcome messages or personal coaching lessons, while sticking to audio-only for dense, slide-heavy content.
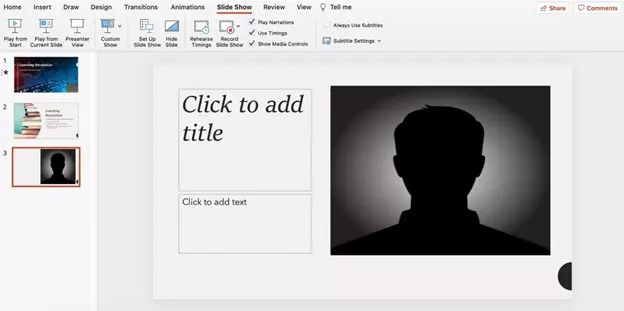
Step 2: Turn Camera ON and Position It
Toggle Camera ON. PowerPoint will place your video feed in the bottom-right corner by default. You can drag it to another corner and resize it.
If your slides have charts or text-heavy content, move the camera to a less crowded area. For storytelling, intros, or personal lessons, keep it larger so your presence is more visible. Many creators record one version with video and one without, then decide which works better for their audience.
Step 3: Set Up Lighting and Framing
Sit at eye level with your camera. Face a natural light source or use a simple ring light. Keep your background uncluttered.
Course creators often underestimate how much lighting affects credibility. Even a basic webcam looks professional with good light. If you’re teaching corporate training, stick to a clean office background. For personal coaching or creative courses, a more relaxed backdrop can make you more relatable.
Step 4: Record Your Presentation
Click Record and start presenting. Deliver your narration as usual — PowerPoint saves both video and audio per slide. If you need to redo a section, re-record that slide only.
This per-slide recording is powerful: it means you can polish your delivery in short chunks instead of worrying about a perfect 20-minute take. Many instructors use this to improve their “on-camera energy” — they’ll redo a slide if they feel their tone dipped.
Step 5: Review and Adjust Placement
After recording, review your video feed placement. If it covers something important, drag it elsewhere or resize it. You can also delete and re-record your video on specific slides.
Think of this as post-production lite. Instructors often shift their camera window when explaining diagrams or case studies, so nothing crucial is hidden.
Step 6: Export with Video Included
Go to File → Export → Create a Video. Choose MP4, 1080p for most course platforms.
MP4 is best for uploading to Thinkific, Teachable, or YouTube. If you’re making internal training videos on Macs, MOV is fine. For lessons where body language and presence really matter (like public speaking or leadership training), export at higher resolution so your video looks crisp.
Adding video isn’t always necessary — but when used strategically, it builds trust, humanizes your course, and helps students stay connected to you as the instructor.
Tip: If you want it to look more professional invest in an external camera such as the Mevo Plus.
Related: How to create a simple home video studio
Did you know PowerPoint also has desktop screen recording features? Step by Step Guide
Where Are PowerPoint Recordings Saved?
One of the most common questions after recording is: “Where did my PowerPoint recording go?” The answer depends on whether you’ve left it inside the deck or exported it as a video file.
1. Embedded Recordings (Default)
By default, PowerPoint saves your audio and video recordings inside the presentation file itself (.pptx).
- Each slide stores its narration and/or video as an embedded media object.
- This means if you close PowerPoint and reopen the deck, your recordings are still there.
- You can re-record, review, or clear narration slide by slide.
Limitations for course creators:
- The embedded media doesn’t automatically generate a standalone video file.
- If you share the deck with students, they’ll only see the recordings if they open it in PowerPoint (not ideal for courses).
2. Exported Files (Recommended)
To create a standalone video, you must export your presentation:
- Go to File → Export → Create a Video.
- Choose MP4 or MOV (MP4 is recommended for course platforms like Thinkific, Teachable, or YouTube).
- Select resolution (720p for smaller file size, 1080p for standard HD, 4K for professional/high-detail).
- This creates a video file on your computer that you can upload anywhere.
Best practice for online courses:
- Always export to MP4 for universal compatibility.
- Save the file in a dedicated “Course Media” folder so you don’t lose track of it.
- Keep the original .pptx file as your “editable master” in case you need to update or re-record later.
If you’re creating professional content, think of the embedded version as your “working draft,” and the exported MP4 as your “final product.”
Can You Record in PowerPoint Online? (Web Version Limitations)
If you’re using the web version of PowerPoint (PowerPoint Online), you may be wondering if you can record your slideshow directly in the browser. The short answer: recording features are very limited in PowerPoint Online, and the desktop version is still your best option.
- What you can do online:
- Insert audio or video files that were recorded elsewhere.
- Play back narrated slides created in the desktop version.
- Basic editing of embedded media.
- What you can’t do online:
- Record audio narration slide by slide.
- Record video of yourself presenting.
- Use Record Slide Show with timings, transitions, or annotations.
- Export a narrated slideshow to MP4 or MOV.
For course creators, this means PowerPoint Online is fine for quick editing or sharing, but if you want to record lessons, webinars, or professional presentations, you’ll need the desktop app (Windows or Mac).
Best practice: Build and record your presentations in the desktop version, then upload/export your finished video files to your LMS, YouTube, or course platform. Use the web version only for collaboration and minor content tweaks.
Troubleshooting Common PowerPoint Recording Problems
Even with PowerPoint’s built-in tools, recording isn’t always smooth. Here are the most common issues and how to fix them:
1. No Audio Recorded
- Check mic settings: In the Record window, make sure Mic ON is enabled and the correct device is selected.
- Windows tip: Right-click the speaker icon → Sound settings → confirm the right input device is active.
- Mac tip: Go to System Preferences → Sound → Input and check your mic levels.
Course creator tip: Always do a quick test slide before recording a full lesson.
2. Clipped or Cut-Off Audio
- PowerPoint only saves narration per slide. If you advance too quickly, the end of your sentence gets clipped.
- Fix: Pause for a second after finishing each slide before clicking forward.
3. Camera Not Working
- Ensure Camera ON is enabled in the Record window.
- Close other apps (Zoom, Teams) that may already be using your webcam.
- If still not working, update your camera driver (Windows) or check privacy settings (Mac).
Pro tip: If you want higher quality video, use an external webcam or mirrorless camera instead of the built-in laptop camera.
4. Export Takes Too Long / Large File Sizes
- High-resolution exports (1080p/4K) take longer and create big files.
- Fix: Export at 720p if your platform or learners need smaller files.
- Trim long or unused recordings before exporting to reduce file size.
5. Can’t Find the Saved Video
- PowerPoint doesn’t auto-save videos — it embeds them in the deck until you export.
- Fix: After exporting, check the folder you selected in the “Save As” dialog. If you didn’t choose a folder, it often defaults to Documents or Videos.
6. Animations or Timings Out of Sync
- Happens if you record narration separately from animations.
- Fix: Use Record Slide Show to capture narration and animations together, or re-run Rehearse Timings.
Best practice: Always record a 1–2 slide test before committing to a full deck. It saves time and ensures your mic, camera, and export settings are working as expected.
How To Record PowerPoint Presentations With Dedicated Screen Recorders
While you can get a perfectly good recording using the native capabilities in PowerPoint, there are powerful third-party tools that can help you take your recorded presentation to a more professional level – increasingly important if you want to stand out in the market for online courses and/or virtual event presentations.
Specialized screen recording or screencasting software offers more post-production options, including professional transitions, closed captioning, the ability to add interactive elements, and direct publishing to content distributors such as Vimeo and YouTube, and additional video file formats, including mov, avi, and mpeg-2.
In this section, we’ll take a quick look at three of the most popular choices:
- Camtasia
- Screenflow
- ScreenPal (formerly Screencast-O-matic)
Each of these is compatible with PowerPoint and offers extra features to make your presentation stand out from the crowd. (You can also find more information about screen recording software here as well as in this review of Camtasia alternatives.)
PowerPoint vs Camtasia vs ScreenPal vs ScreenFlow for Recording PowerPoint Presentations
| Feature | PowerPoint | Camtasia | ScreenPal | ScreenFlow |
|---|---|---|---|---|
| Direct PowerPoint Integration | ✅ Built-in (Slide Show → Record) | ✅ PowerPoint Add-In available | ❌ No native integration (records screen instead) | ❌ No native integration (imports slides as images) |
| Record Narration Per Slide | ✅ Yes (re-record individual slides) | ❌ Records continuous video, not per slide | ❌ Records continuous video | ❌ Records continuous video |
| Record Presenter Video | ✅ Yes (camera feed per slide) | ✅ Yes (multi-track video + audio) | ✅ Yes (overlay webcam while recording) | ✅ Yes (record screen, mic, and camera together) |
| Editing Tools | ❌ Very limited (trim, delete, re-record per slide) | ✅ Advanced editing: cut, transitions, effects, captions | ✅ Basic editing: trim, cut, add text/captions | ✅ Advanced editing: multi-track editing, transitions, effects |
| Export Options | MP4 / MOV / WMV | MP4, MOV, AVI, GIF, SCORM | MP4, AVI, FLV, GIF (depending on plan) | MP4, MOV, M4V, AIFF, GIF |
| Best For | Quick course lessons, internal training | Professional online courses, SCORM LMS, polished training | Budget-friendly course creators, simple tutorials | Mac users who want Camtasia-level polish at a lower price |
| Limitations | Minimal editing, no SCORM, limited to per-slide style | Steeper learning curve, higher cost | Less feature-rich, free plan limited | Mac-only, no SCORM export |
Key Takeaways
- PowerPoint is perfect for quick, per-slide narrated lessons and simple video exports.
- Camtasia is the pro choice if you want serious editing, SCORM export, and LMS tracking.
- ScreenPal is great for beginners on a budget who still want basic editing and webcam overlay.
- ScreenFlow is ideal for Mac creators who want more polish than PowerPoint but at a lower cost than Camtasia.
Final Thoughts
PowerPoint has come a long way from mundane bullet point slides and gimmicky transitions. Now a host of impressive design and editing tools allow you to create engaging, informative
video presentations for your online courses, webinars, and lecture series. And native tools make it possible to record a PowerPoint presentation so that it can be access and played according to the specific schedules of your audience members.
Getting skilled at recording your presentations is more important than ever. The COVID-19 pandemic demonstrated the value of virtual learning across multiple fields and industries, and there’s every reason to believe that more and more conferences, courses, and events will continue to make video learning a core part of their strategy in the future.
As recorded presentations grow in popularity, though, event planners, attendees, training purchasers, and learners will demand higher quality content. So, it’s more important than ever to produce professional, quality videos that captivate your audience and demonstrate the value of your expertise. PowerPoint and accompanying video editing programs now make creating beautiful presentations easier than ever before.
Frequently Asked Questions (FAQs)
Can I record a PowerPoint presentation with background music?
Yes. You can insert background music into your slides via Insert → Audio → Audio on My PC before recording. PowerPoint will play the audio track while you narrate. For online courses, keep music subtle so it doesn’t overpower your voice.
How long can a PowerPoint recording be?
There’s no strict time limit — it depends on your computer’s storage and export format. However, extremely long decks (1+ hours) may produce very large video files. For online courses, it’s better to break lessons into smaller, 5–15 minute recordings.
What is the best format to save a recorded PowerPoint presentation?
MP4 is the most universal format for online platforms like YouTube, Thinkific, or Teachable. MOV is fine for Mac users but may cause compatibility issues on some devices. WMV works only on Windows.
Can I record PowerPoint with subtitles or closed captions?
PowerPoint doesn’t generate captions automatically, but you can turn on Live Captions & Subtitles during your presentation. For recorded content, you’ll need to add captions in a video editor like Camtasia or upload your MP4 to YouTube and use auto-captioning.
Can you record a PowerPoint and still see your notes?
Yes. When recording, use Presenter View — your notes are visible to you but not recorded in the final video. This helps course creators stay on script without cluttering the slides.
Why is my recorded PowerPoint video so large?
High resolution (1080p/4K), animations, and embedded media all increase file size. Reduce resolution to 720p or compress media (File → Info → Compress Media) to shrink the export.
Can I pause while recording a PowerPoint presentation?
Yes. In the Recording Studio, click Pause at any time, then Resume to continue. This is useful if you need a break during a long session without starting over.
Does PowerPoint record animations and transitions?
Yes. When you record with Record Slide Show, all slide timings, transitions, and animations are saved along with narration. Make sure to rehearse so your speech aligns with the builds.
Can I edit a recorded PowerPoint presentation?
You can re-record narration or video on individual slides without redoing the whole deck. For more advanced edits (cutting mistakes, adding captions), export as MP4 and edit in tools like Camtasia, ScreenFlow, or Adobe Premiere.
How do I share a recorded PowerPoint presentation with students?
The best method is to export as MP4 and upload it to your LMS (Thinkific, Teachable), video host (YouTube, Vimeo), or cloud service (Google Drive, OneDrive). Sharing just the .pptx file isn’t ideal since students need PowerPoint installed to view recordings.
See also:
- Camtasia Review
- Camtasia Alternatives
- Optimizing PowerPoint for E-learning
- 7 Steps to Record a Successful Virtual Presentation
- ScreenPal (Formerly Screencast-O-Matic Review (2024) | Is It The Best Free Screen Recorder?
Table of Contents
Related Posts
How To Convert PowerPoint To An E-Learning Course (Step-By-Step Guide)
7 Best Camtasia Alternatives for Creating Online Courses (2026)
How To Make Money on YouTube: 10 Proven Strategies (2026)