Whether you’re selling online courses, coaching programs, or digital products, you’ll need to use screen recordings, annotated screenshots, and other forms of visual content to create an online learning experience for your users. This is where this ScreenFlow review comes in.
Most Mac users who create screen recordings have heard of ScreenFlow as it has been around since 2008. But is it still worth using and offers the features modern content creators need?
In this detailed ScreenFlow review, we’ll take a closer look at its core features, benefits, pricing, and pros and cons to help you determine if it’s the best screen recorder for your needs.
Let’s get started.
Quick Verdict: Is ScreenFlow Worth Using?
Don’t have time to read the full article? Here’s my quick verdict on ScreenFlow:
ScreenFlow is rightly considered the best screen recorder for Mac users. ScreenFlow offers everything you need to create highly engaging HD screen recordings for your online courses and digital products at an attractive price point despite an outdated look.
So, if you’re a Mac user looking for the best software for screen recordings and video editing, ScreenFlow is an excellent choice.

How did I reach this verdict? Read the full review to find out.
ScreenFlow Review: What Is ScreenFlow?
ScreenFlow is a hugely popular screen recorder, video editor, and screen capture tool with millions of customers worldwide. It is designed to help Mac users easily create professional-grade screen recordings and videos using its wide-ranging features.
ScreenFlow is ideal for online course creators and digital product sellers looking to develop engaging content for their customers. It allows you to create simultaneous screen, camera, and mic recordings perfect for online presentations, webinars, and workshops.
Its HD screen recording features help you capture the full essence of Apple’s retina display and provide an outstanding user experience.
It also offers advanced video editing features such as in-video zoom, annotations, and video filters to highlight specific screen sections and communicate your message more effectively.
Before diving deeper, here’s a summary of ScreenFlow’s most notable features.
- Screen capturing and recording
- Video editing
- Video annotations, highlighting, and zoom
- Simultaneous screen, mic, and camera recording
- Multi-screen recordings
- Stock library with over 500K images and videos.
- Animation, transitions, text, and image overlays.
- Video filters and background remover.
- Title screen animation templates
As you can see, ScreenFlow covers most bases when it comes to video recording, editing, and screen capturing. But let’s take a closer look at its features to decide if it’s suitable for online course creators.
ScreenFlow Features: Screen Recording & Video Editing On Mac
A review of ScreenFlow features reveals a wide range of video recording and editing tools designed to help online course creators, digital product sellers, teachers, trainers, and corporate professionals create high-quality content.
Here are some of its main features.
High-Quality Screen Recording
ScreenFlow offers world-class screen recording features that allow you to capture every detail of your computer screen in the form of a high-definition video.
Since the screen recording platform is designed for Mac users, it captures the true essence of Apple’s retina display better than any other screen recorder.
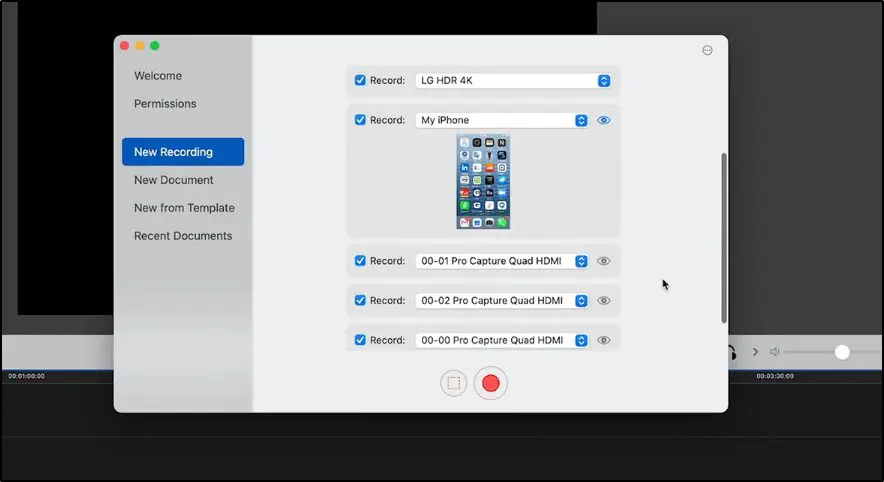
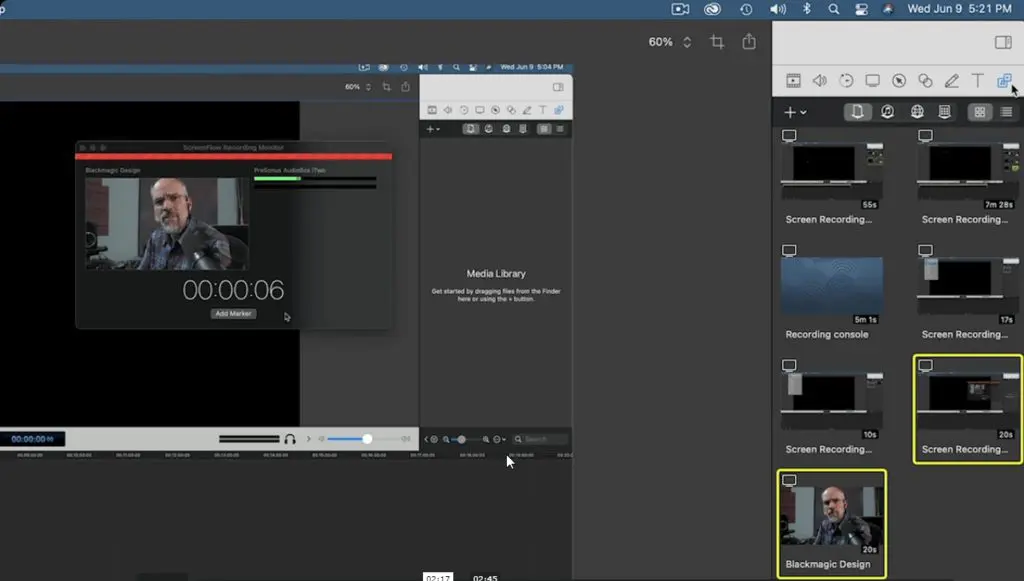
But multi-device recording is ScreenFlow’s most impressive feature. It allows you to record from multiple devices like your desktop screen, secondary monitor, mobile phones, mics, audio devices, and other content sources all at the same time.
For example, in this screenshot, you can see five different devices selected for recording simultaneously.
This feature is a gamechanger for online course creators and digital product sellers.
Why? Because it allows you to use your camera to record your face, your monitor to record screen activity, and an audio input to record your voice to help you create highly actionable video lessons.
It makes your content much more engaging and professional, resulting in a higher perceived value of your course and more chances of success.
And here’s the best part.
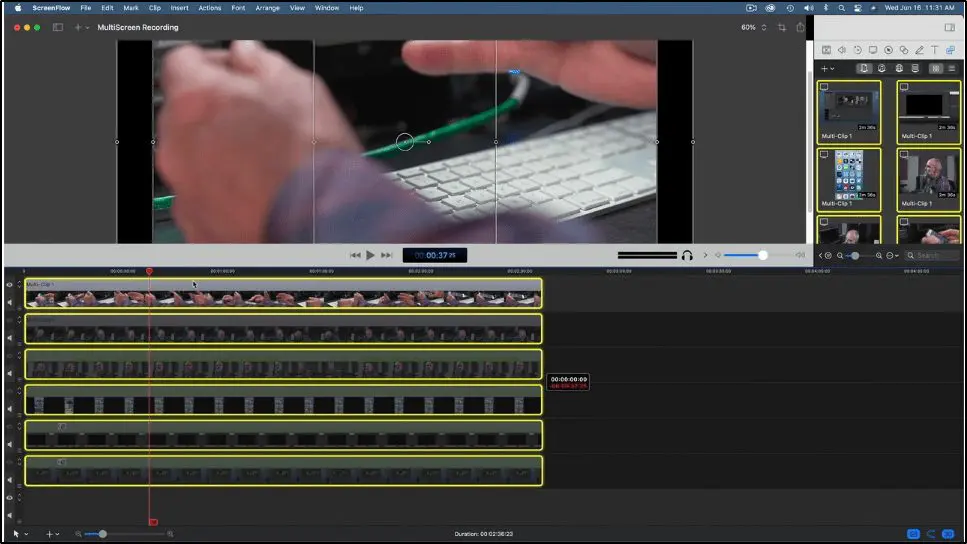
Handling these multi-device tracks is a breeze in ScreenFlow. It records the content from your devices separately and organizes it in a timeline view where you can easily switch between different devices to create video exactly the way you want.
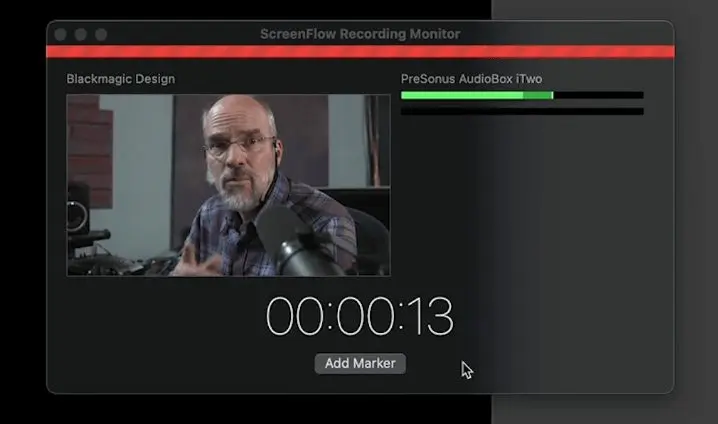
ScreenFlow has a clean and intuitive recording interface that doesn’t overburden the user with unnecessary options and only shows the features you need while recording. For example, you can add a marker anywhere during your video recording and return to it in the editing phase.
As a ScreenFlow user, you can record full-screen videos with a resolution of up to 2880×1800. This allows you to create high-definition video content for your audience that captures the full details of your screen.
You can also use partial screen recording by selecting a specific portion of the screen.
Thanks to ScreenFlow’s advanced algorithms, it detects and records the changing parts of your screen only, allowing you to create HD screen recordings at optimum file size.
In short, the software gives you everything you need to effortlessly create HD screen recordings for your digital products and online courses.
Powerful Video Editing Tools
A review of ScreenFlow’s video editing features show they are also among the best in the business. The software provides you with various tools to transform your videos into professional content that can make an impression on your customers.
ScreenFlow gives you a timeline view to edit and modify your video files. The timeline contains multiple tracks to combine different recording sources such as your screen, camera, audio device, etc.
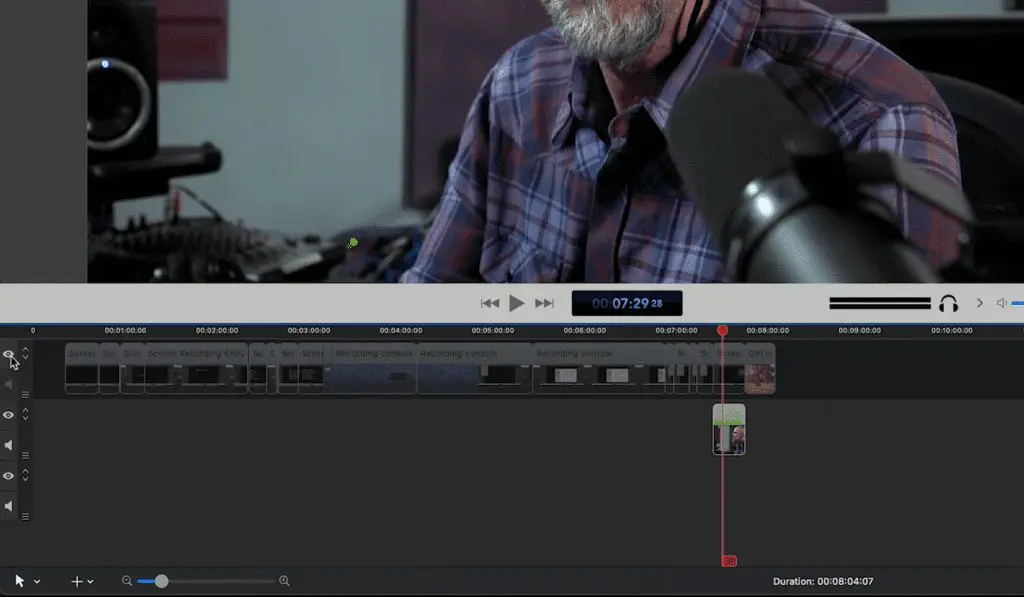
As a user, you can see a complete breakdown of your video frame by frame, which helps you precisely edit your content. In addition, the editing interface allows you to drag & drop tracks to change their order or sequence.
Using this editing interface, you can crop and trim your videos, add filters, insert media, and modify your content in numerous other ways.
For example, you can use callouts to highlight different video sections with effects such as zoom-in, grayscale, etc.
Similarly, you can add different transitions and annotations to your videos.
Annotations, in particular, play a vital role in improving your content engagement and helping you drive conversions.
ScreenFlow also comes with an extensive title animation library. It contains various types of title animations that you can use at any stage of your video.

These titles are fully customizable, which means you can tailor them to your brand’s colors and style. You can also change the animation type later if you’re not satisfied with how the video looks. To do that, simply grab the frame where you’ve added the animation and modify it from the settings panel.
Overall, ScreenFlow comes with a robust set of video editing tools, providing you with complete control over your content’s appearance.
Versatile Video Enhancements
Apart from the regular video editing features, ScreenFlow offers several video enhancement tools to make your content even more attractive. Let’s review ScreenFlow from this perspective.
For example, it provides you with a filter library using which you can apply various visual effects to your video.
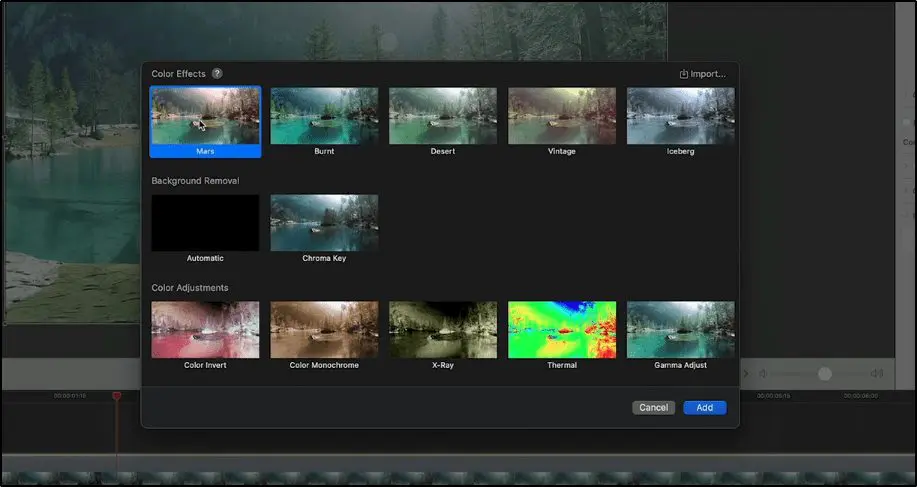
Similarly, the library contains effects such as color adjustments, stylizations, and blur or sharpen effects. Each effect has its own impact on your video’s appearance. But when combined correctly, they can make your content very eye-catching.
ScreenFlow also allows you to apply background removal effects without distorting the video quality.
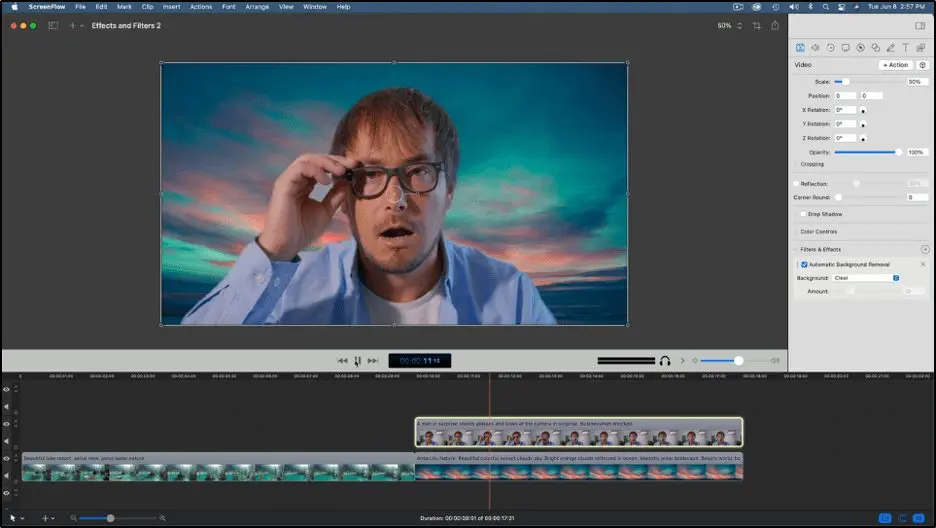
You can replace the background with an image or blur it, making the speaker more prominent.
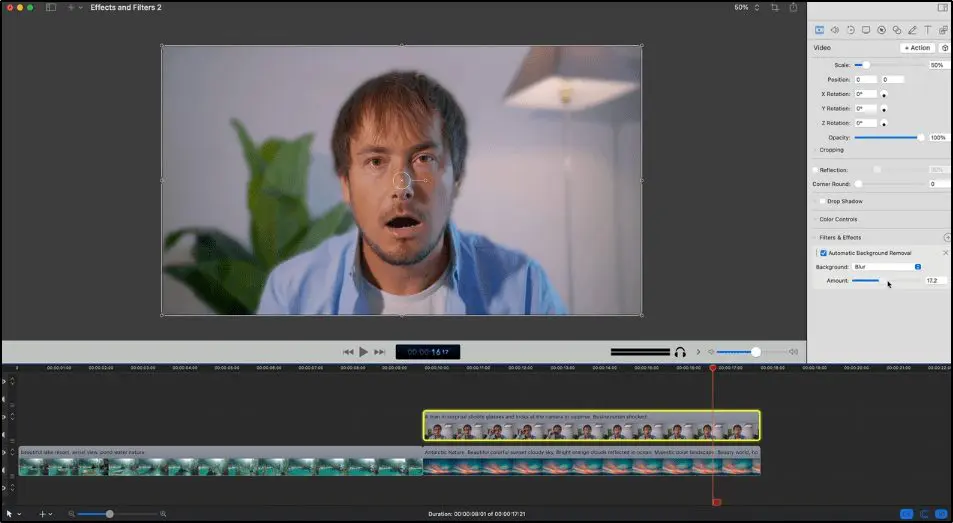
Each effect in ScreenFlow is completely customizable, and you can even create your own filters and to your library.
Robust Screenshot Capture Tool
This ScreenFlow review is for how the software is used primarily as a screen recorder and video editor. But you can use it as a screen capture tool as well.
How? By breaking down your recording frame by frame in the video editor’s timeline view. So, to get a screenshot, simply run a screen recording and export the specific frame you want to use as a screenshot.
Now, how do you make your screenshots more engaging? By using annotation, adding text, or inserting elements such as boxes, text-shadow, outline, end-points, or another image.
Once you’re done editing, save the frame as a PNG image file to use in your course content.
Closed Caption Support
ScreenFlow has a separate caption editing tool in its video editor. You can use it to create, edit, and publish ADA Compliant soft subtitles as captions to your screencasts when exporting them as MP4 movies and YouTube videos.

You can copy/paste text from another file, type the subtitles in the captions box, or import them from an SRT file from your computer.
You also have the option to enter captions in dozens of different languages right from your editing window.
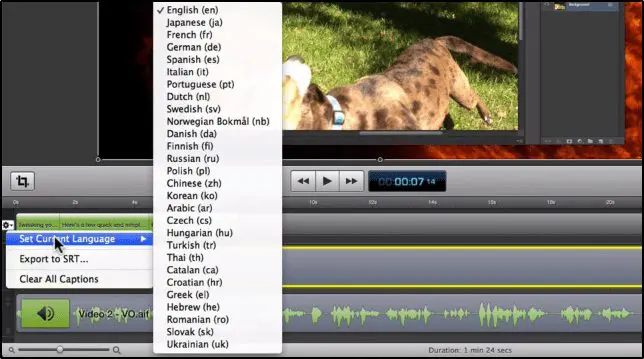
ScreenFlow allows you to create captions for any video frame easily and then drag the caption track to apply it across multiple frames.
Finally, when you’re down creating the subtitles, you can export them as an SRT file for future use or simply publish your video in your preferred format.
Captions are not enabled by default. So, if you want to add subtitles, you’ll need to add the captions track from the video editor’s View menu.
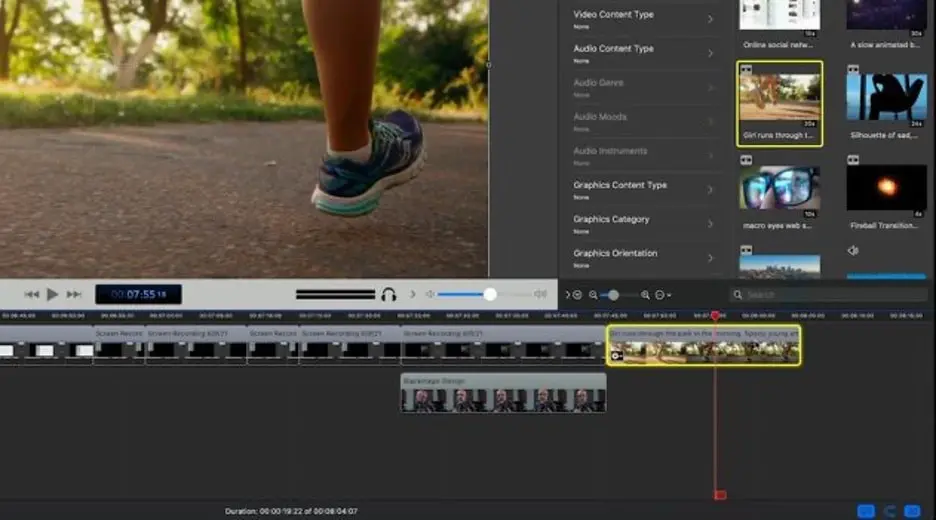
Built-in Stock Media Library
One of the biggest perks of using ScreenFlow is its world-class built-in stock media library which has over a million videos, images, and audios for numerous industries.
The stock library is accessible from ScreenFlow’s video editor and consists of various categories and types of media that you can simply drag & drop to your timeline.
You can find SD, HD, and 4K videos clips in the stock library, include as a separate track in your video timeline and customize them using annotations and the other editing options available in ScreenFlow.
Similarly, you can use audio clips from the stock library in your video background to make them more impactful and engaging.
Personally, I consider the stock library a huge plus for online course creators and digital product sellers because it allows you to add professional quality footage to your courses without creating it yourself.
The stock library is not included in the basic subscription plan, and you’ll need to subscribe to it separately (totally worth it, IMO).
How to Screen Record on Mac with ScreenFlow
Now that we’ve seen what this powerful software can do, let’s discuss the How part. Here’s how you can screen record on Mac using ScreenFlow.
Step 1: Start your free ScreenFlow trial by downloading it from the website.
Step 2: Run the setup file and follow the instructions to install ScreenFlow on your computer.
Step 3: Open ScreenFlow
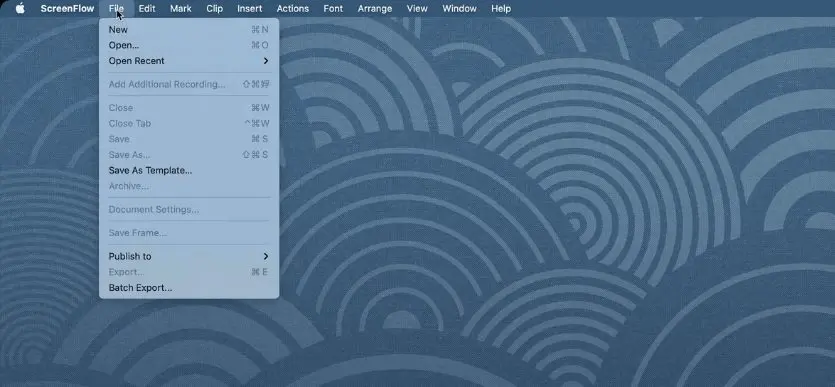
Step 4: Click File → New from the top menu.
Step 5: Click New Document and choose your video file settings.
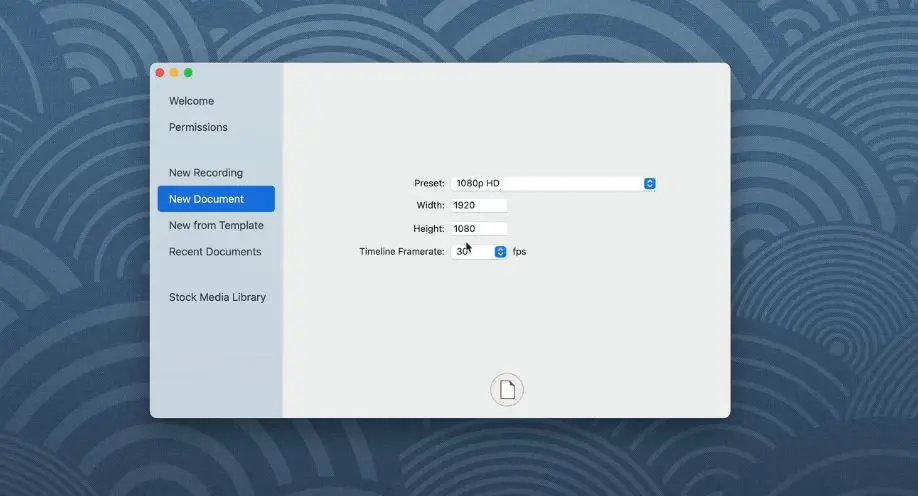
Step 6: Now click the document icon to create your file.
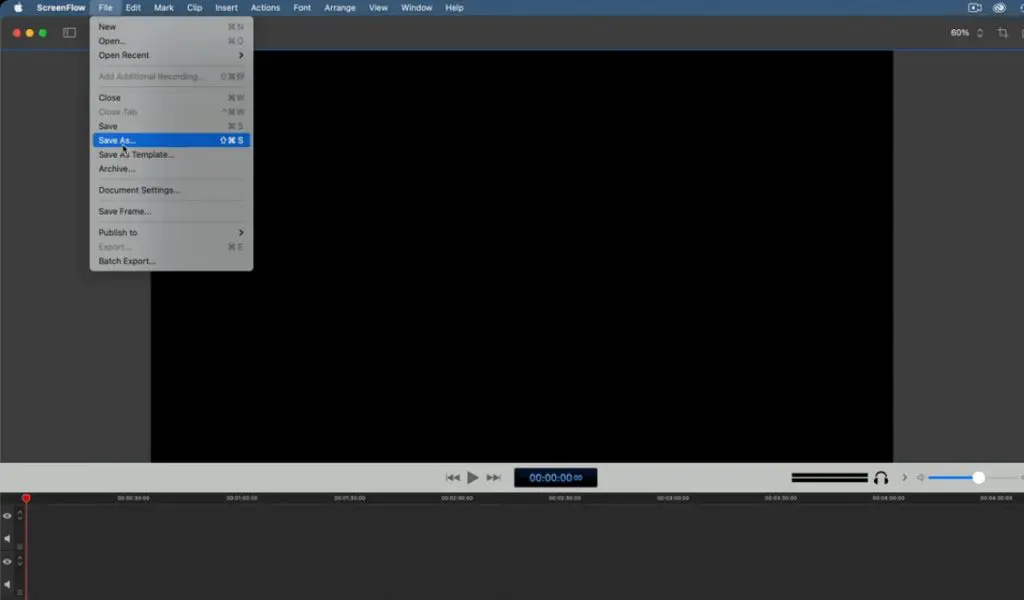
Step7: Go to File → Save As to save your video file project.
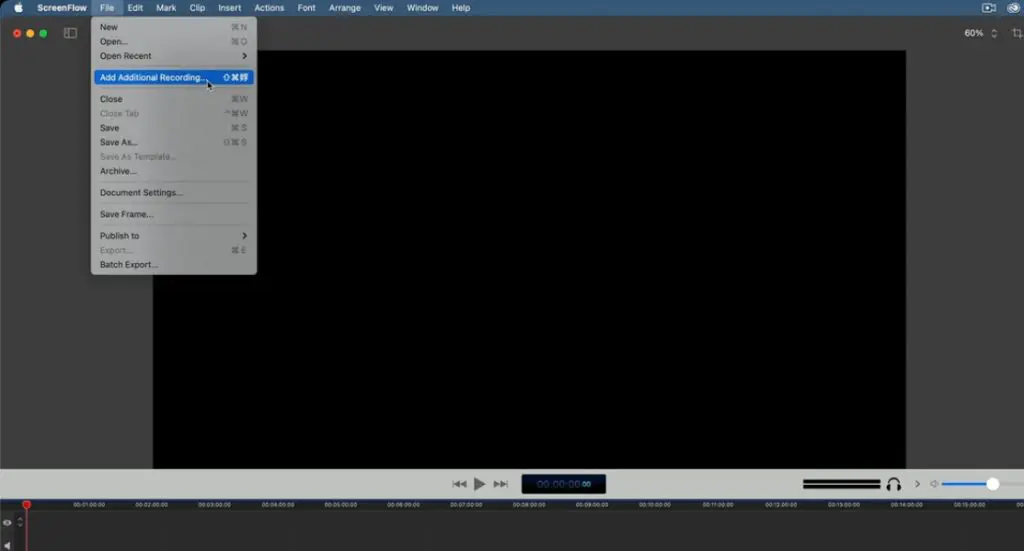
Step 8: To add a new screen recording, go to File → Add Additional Recording.
Step 9: Here, you can choose multiple video and audio sources to record from.
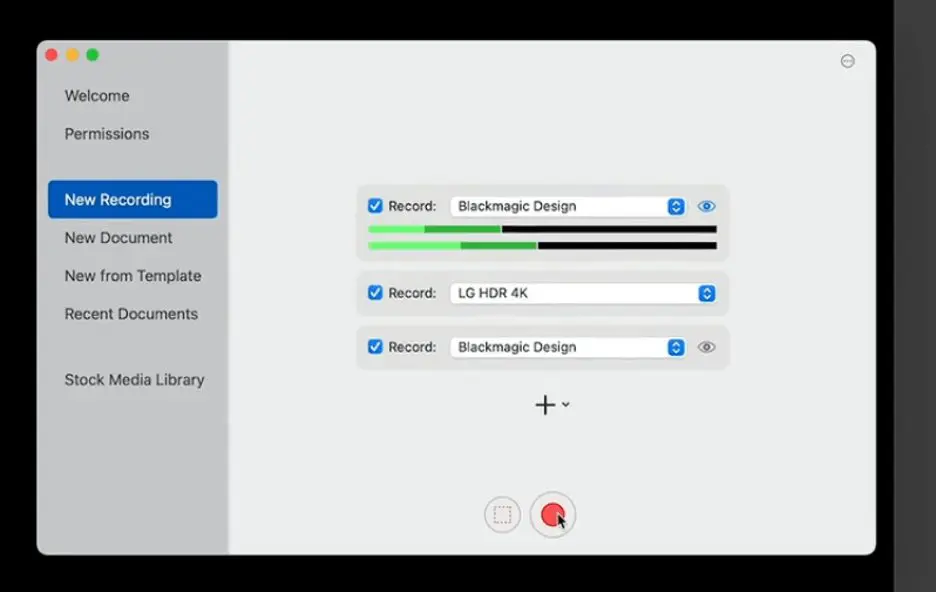
Step 10: Click the record button to start the recording.
Step 11: To mark any frame during your recording, click the Add Marker button.
Step 12: Press Command+Shift+2 to finish the recording.
Step 13: Choose Add To Document and enable the checkbox next to Add Clip Directly To Timeline.
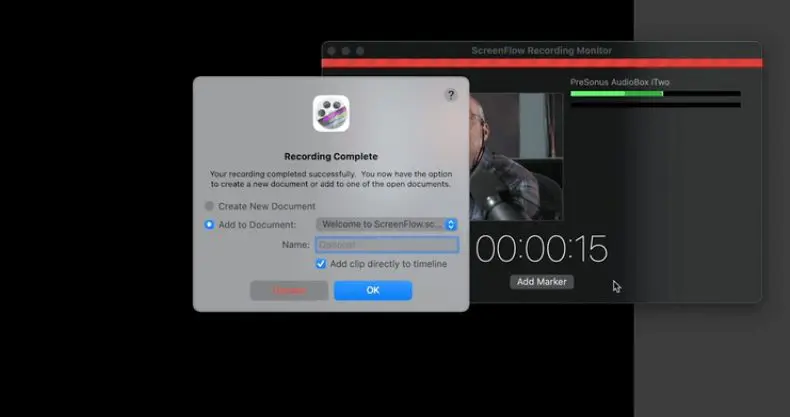
Step 14: Your recording is now added to the media library visible on the right-hand corner of your screen.
Step 15: You can drag the clip from the media library to your timeline for editing.
Step 16: From here, you can edit the clip by applying filters, adding new media from the stock library, using annotations, and all the other available options.
Step 17: Once you’ve completed the editing part, save the file.
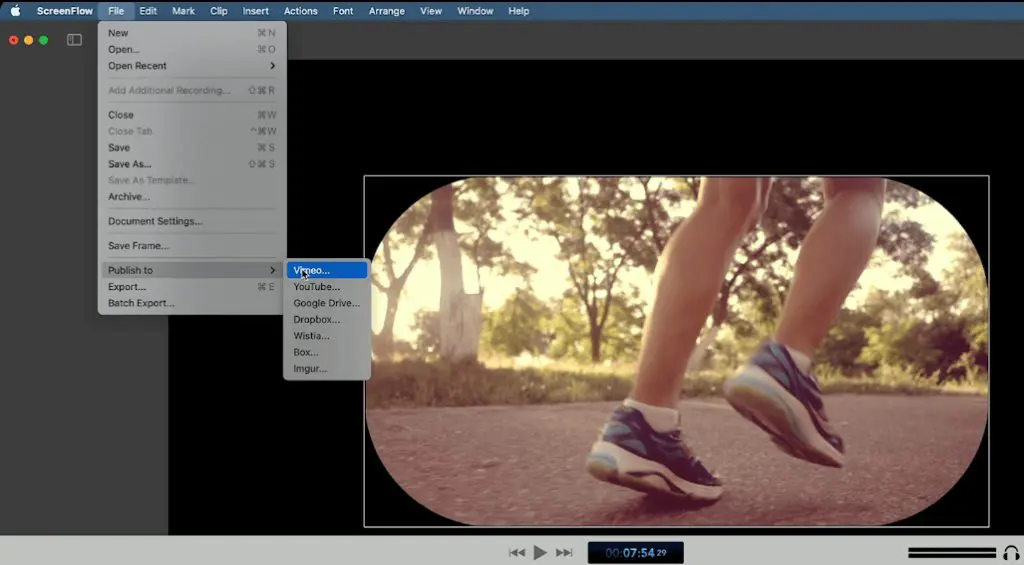
Step 18: You can now export this project as an MP4 file or other available formats in ScreenFlow from File → Export.
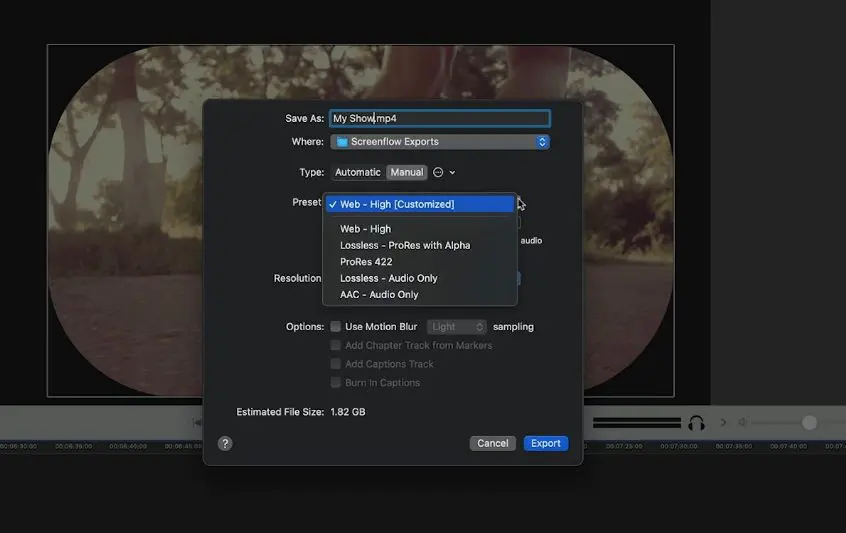
Step 19: You can also directly publish it to any popular video platform from File → Publish To.
That’s all you need to do to screen record videos using ScreenFlow. But these are just the basics. You can do a lot more to your content using the options I discussed earlier in this article.
ScreenFlow Review: Pricing Plans & Free Trial
Is it worth It?
ScreenFlow has three different pricing plans with fixed one-time price tags. Plus, it offers an unlimited free trial with all the premium features.
What the catch? The videos of free trial users are watermarked if they do not upgrade to a premium plan within thirty days.
Here’s what the three pricing plans offer.
ScreenFlow – Single @ $149 one-time license fee
This plan offers core features like screen recording, video editing, and multi-device support.
ScreenFlow – Super Pak @ $209 one-time license fee
This plan contains everything in the basic plan, plus access to ScreenFlow’s stock library at an additional $60/year.
ScreenFlow – Super Pak + Premium Support @ $239
This plan offers the stock library at $51/year for the first year, along with premium support and software upgrades at $39/year.
For most users, getting the Super Pak plan makes the most sense. However, if you don’t need the stock library, the basic plan has all the screen recording and video editing features you need.
ScreenFlow Review: Pros and Cons | What Makes It Different?
So, before reaching the final verdict, let’s quickly review ScreenFlow pros and cons.
ScreenFlow Advantages
We’ve already discussed most of ScreenFlow’s best features. But here are some of its other strengths.
Supports iOS Screen Recording
ScreenFlow supports multi-device recordings which include iPhone and iPad. This means you can easily create high-quality app reviews, tutorials, demo videos, and other content necessary for your business.
Allows Multi App Recording
ScreenFlow’s multi-app recording means you can easily record audio and video content from multiple applications simultaneously. For example, you can have audio coming in from one app on your iPhone, another from your external audio device, and a third from an application running on your computer. Don’t worry, it won’t mix up since every audio is stored in a separate track where you can edit and mix it with the other tracks.
Lightweight Tool with A Smooth User Experience
Despite processing large files and rendering videos, ScreenFlow is a surprisingly lightweight application that does not slow down your computer or affect any of your other programs. This also means that your program window will never freeze to cause recordings lags and other problems.
Multiple Direct Publishing Options
As I’ve already mentioned, you can directly publish your videos to YouTube, Vimeo, Wistia, Google Drive, and several other video storage platforms. ScreenFlow also recommends a different video setting for every platform, ensuring the best quality and performance.
GIF And MP4 Support
You can save your ScreenFlow videos as MP4 files making them universally acceptable for any platform. Plus, you can create animated GIFs from your video files by selecting a shorter duration. GIFs are incredibly engaging, especially when creating product tutorials or explaining step-by-step processes.
Disadvantages Of ScreenFlow
Like any other product, ScreenFlow isn’t perfect. Here are some of its flaws.
Outdated Look & Feel
For such a modern application, ScreenFlow has a pretty outdated look and feel compared to other screen recorders. Most of its options work through menus or shortcuts. But there aren’t many quick launch icons to perform frequent tasks.
Limited User Engagement Features
Many other popular screen recorders offer features like clickable CTAs and quizzes to help you improve your content engagement. Unfortunately, ScreenFlow does not provide such features. Plus, it lacks commonly used graphic elements such as arrows and question marks.
Additional Fee for The Stock Library
ScreenFlow’s stock library is one of my favorite features. However, it comes with an additional fee which is a big turn-off. When you consider the cost of the stock library subscription, ScreenFlow’s pricing doesn’t look as attractive as before.
ScreenFlow Verdict: Is ScreenFlow The Best Video Recorder For Mac?
So, what do you think after reading everything I’ve shared in this ScreenFlow review? Do you think it’s worth using?
Here’s my verdict.
Despite its drawbacks, ScreenFlow is still a mighty impressive screen recorder and video editor for online course creators, digital product sellers, and e-learning professionals.
It’s easy to use and offers you all the necessary features to create HD screen recordings. Plus, its editing features allow even non-technical users to transform raw videos into professional content that makes a strong impression on the viewers.
In short, I consider ScreenFlow as one of the best screen recorders for Mac and an excellent investment for content creators.
See also:
- Camtasia Review – Create Video Tutorials and Courses
- ScreenFlow vs Camtasia | Which Is the Best Screen Recorder & Video Editor
- Best Screen Recording Software
ScreenFlow Review: Frequently Asked Questions (FAQs)
Is there a free version of ScreenFlow?
ScreenFlow does not offer a free version, but you can use its fully functional free trial with no time limits. However, after 30 days of the free trial, your videos are watermarked unless you purchase a premium plan.
Is ScreenFlow for Mac only?
Yes, ScreenFlow is only available for Mac users and does not work on Windows or other operating systems.
Is there a ScreenFlow for Windows?
No, ScreenFlow is not available for Windows. However, Camtasia is a pretty impressive ScreenFlow alternative for Windows users.
Is ScreenFlow better than iMovie?
Both ScreenFlow and iMovie are excellent tools for creating high-quality videos. However, ScreenFlow offers a broader feature range, making it the better option.
Which is better, ScreenFlow or Camtasia?
Camtasia and ScreenFlow are powerful screen recorders and video editors with very similar features. But ScreenFlow has more affordable pricing plans. Read our detailed ScreenFlow vs. Camtasia comparison to get more details.
Is ScreenFlow a video editor?
Yes, ScreenFlow is among the best video editors and screen recorders for Mac users.
What is ScreenFlow used for?
ScreenFlow is used by online course creators, digital product sellers, eLearning professionals, educational institutes, corporate trainers, and numerous other professionals looking for world-class screen recording and video editing features.
Can ScreenFlow handle 4K?
Yes, ScreenFlow allows you to edit 4K videos without any problems. Plus, it beautifully captures Apple’s retina display in screen recordings and helps you create HD content easily.
What are the best ScreenFlow alternatives?
iMovie, Camtasia, Loom, Kazam, etc., are some popular ScreenFlow alternatives for Mac users.
Table of Contents
Related Posts
Podia Review (2026): Is The New Community Angle Worth Using?
Are Thinkific’s Email Marketing & Automation Features Worth Using (2026)
76 Fresh Instagram Statistics For Marketers and Creators (2026)